Online Documentation - The up to date documentation
Table of contents:
- 1. Hosting Requirements
- 2. Theme Installation Instructions
- 3. Setting Up Room Viewer
- 4. Guesthouse homepage layout
- 5. How to set / change social and tooltip icons
- 6. Creating Custom Menus
- 7. Setting Up Portfolio
- 8. Setting Up Contact Form
- 9. Translating theme to other languages
- 10. Displaying Portfolio Items
- 11. Inserting Service Boxes
- 12. Booking Calendar Plugin Customization
- 13. Advanced users: Editing HTML files
- 14. Editable custom type
- 15. Guesthouse reservation module setup
- 16. Slider with custom reservation module
- 17. "How to..." Videos
1. Hosting Requirements
We always test our theme on most standard hosting set ups, however make sure your hosting match the following requirements:
- PHP5 version
- PHP5 GD library installed
- Notices & Warnings are turned off
- We also recommend mod_rewrite enabled
- Memory limit set up at least 64MB
- upload_max_filesize at least 10MB
- Please also check that you have permissions to write to theme folder
2. Theme Installation Instructions
Installation Screencast
Whole installation process in covered in the following video tutorial.
Theme Installation
Theme should be installed standard way via wordpress admin panel.
- Please navigate to "Appearance -> Themes -> Install Themes"
- Click on Upload
- Select your theme from WP folder that is included in the Zip file you purchased.
- Click Install Now
- After the theme is successfully installed, click Activate
[notification type="attention"]Please, do not change the name of theme folder and prefix of Wordpress database tables (default prefix is "wp_").[/notification]
Importing Default Content
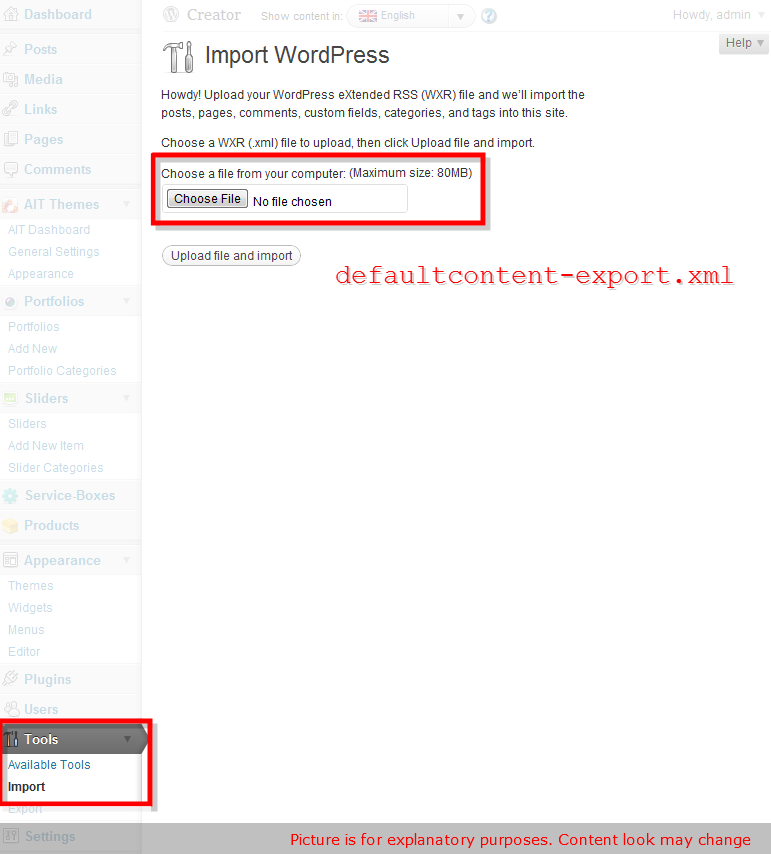
For faster site development we recommend you to import default content. Default content shows you all page layouts, shortcodes and other post types. If youd like to import it, you can do it via Tools -> Import -> WordPress -> Upload file and import. Please select a file called defaultcontent-export.xml and and simply click Upload file and import. We recommend you installing Contact Form 7? plugin before running import. Itll import you also contact form examples.
NOTE: for importing content use this plugin WordPress Importer.
Setting Up Homepage and Blog
Please note that you have to select a homepage and posts page for our theme to work properly.
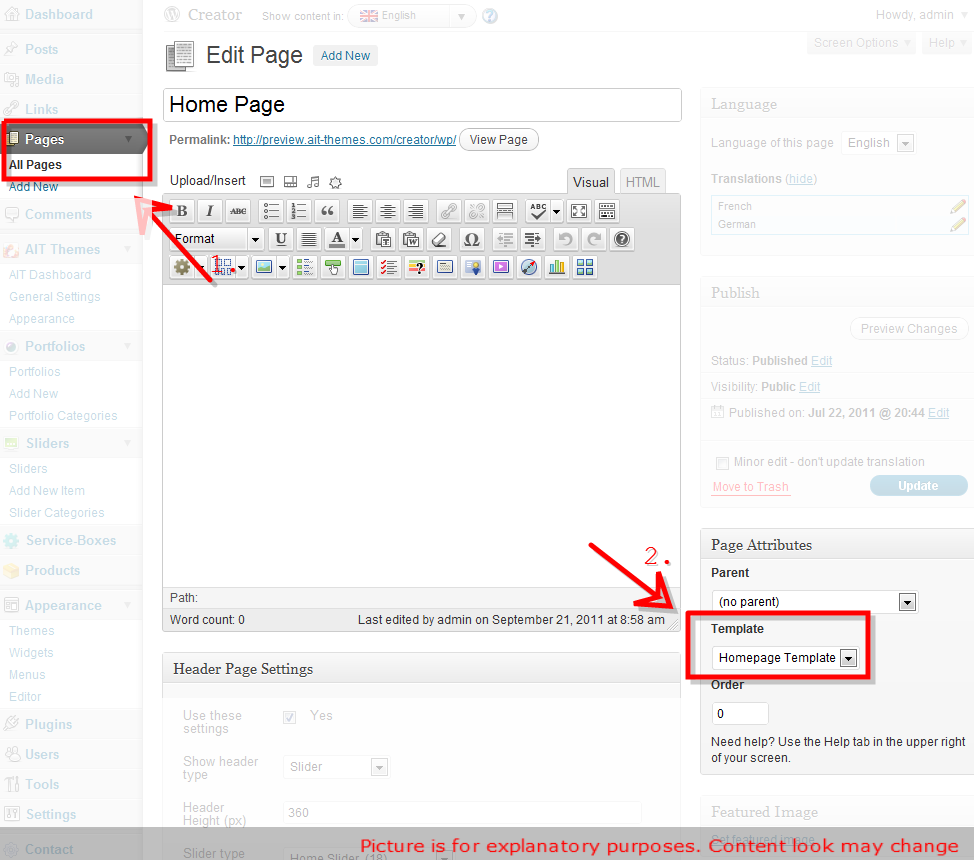
1. If you havent uploaded our default content, please create a new page. You can of also edit the existing homepage we provided in default content.
2. Select Homepage template layout for the page that should become your homepage.
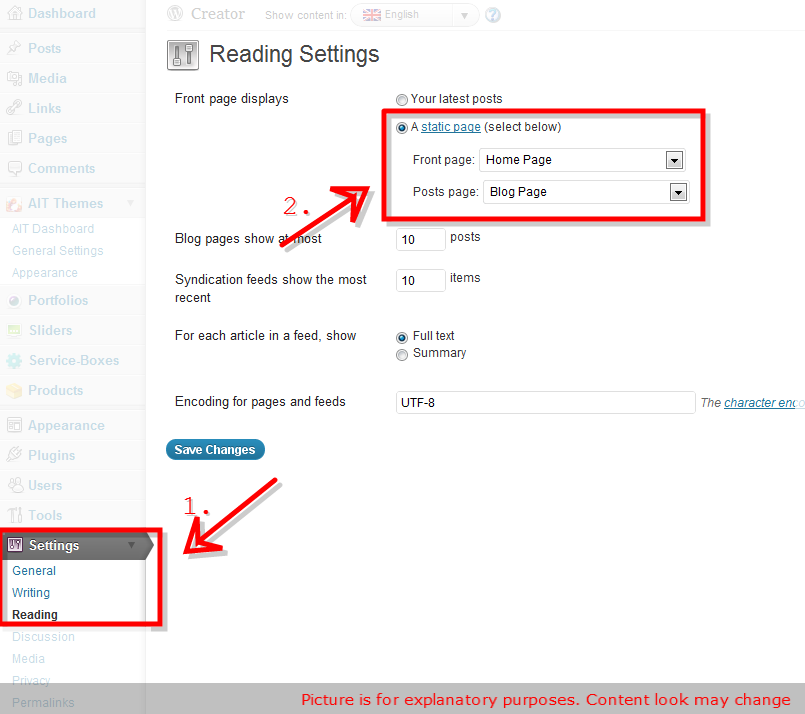
3. Navigate to: Admin -> Settings -> Reading and set a static Front page & Posts page:
3. Setting Up Room Viewer
The Room Viewer is the main part of this template. Function of the room viewer is to present the rooms in your hotel in a slide kind of way.
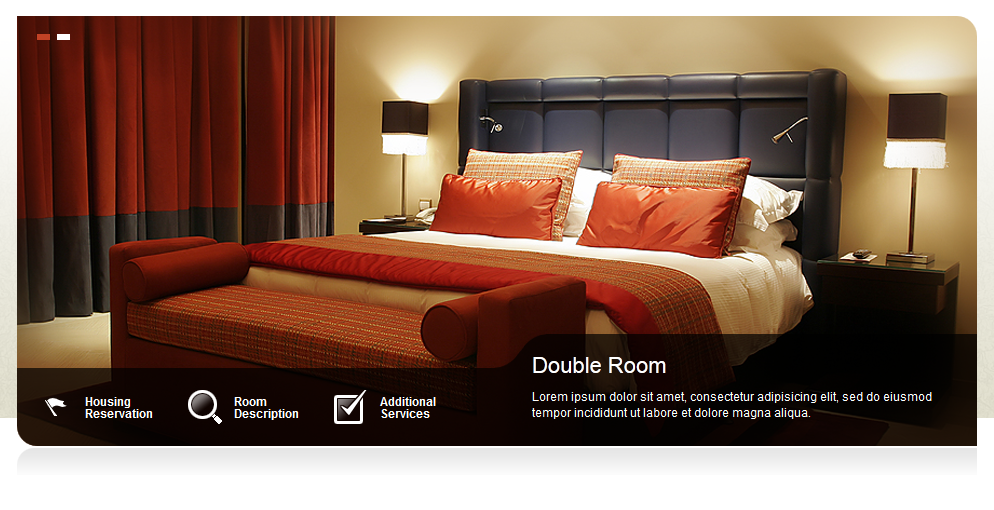 The viewer contains 3 actions, whitch you can enable or disable:
- Housing Reservation this is the small contact form for booking the room
- Room Description this action will show you the detailed information about the current room
- Additional Services this action is for viewing the services you can get if you choose to stay
On the right-side of the toolbar, we can see a small description about the room, also with the name of the current room.
Housing Reservation Form
The small housing reservation form is the quickest way to book what you currently see in the background of the room viewer. Visual part of the form is shown in the pictures below.
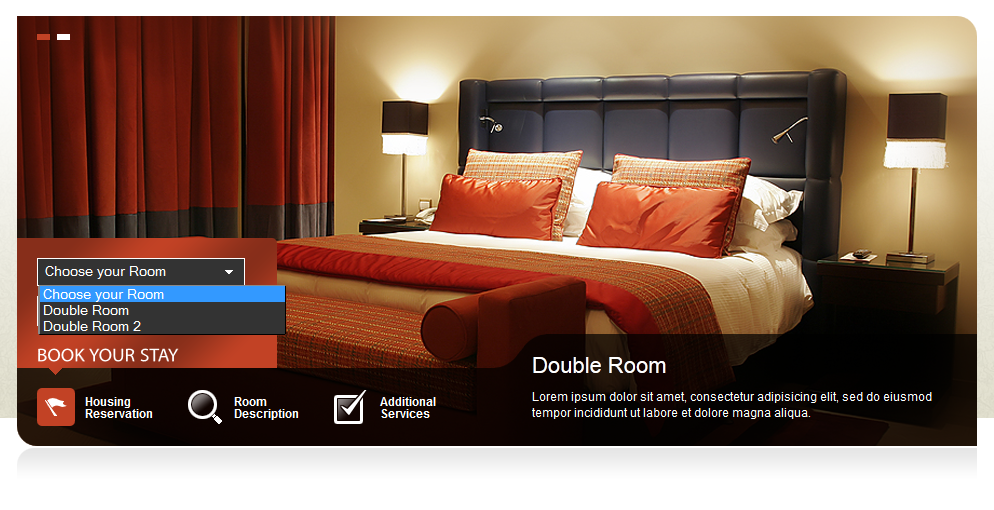 The First input the user needs to fill is the Name of the room. In the picture we can see the Double Room and the Double Room 2 room, that the user can choose. Second thing user needs to specify is the date of the Arrival and the date of the Departure. These two dates are implemented with datepickers for you and your visitind guests comfort.
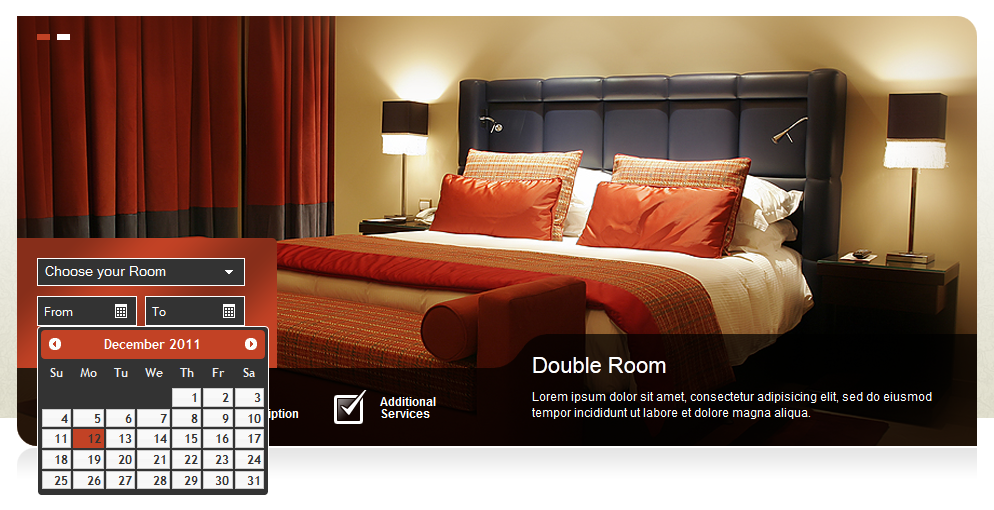 Date format of the datepickers can be set up in the Global options in the wordpress admin.
Next step in the booking process of a room is to click BOOK YOUR STAY. The Action after the click will send the user to big booking form, where he needs to specify the contact form information abour himself. You can see the layout in the picture below.
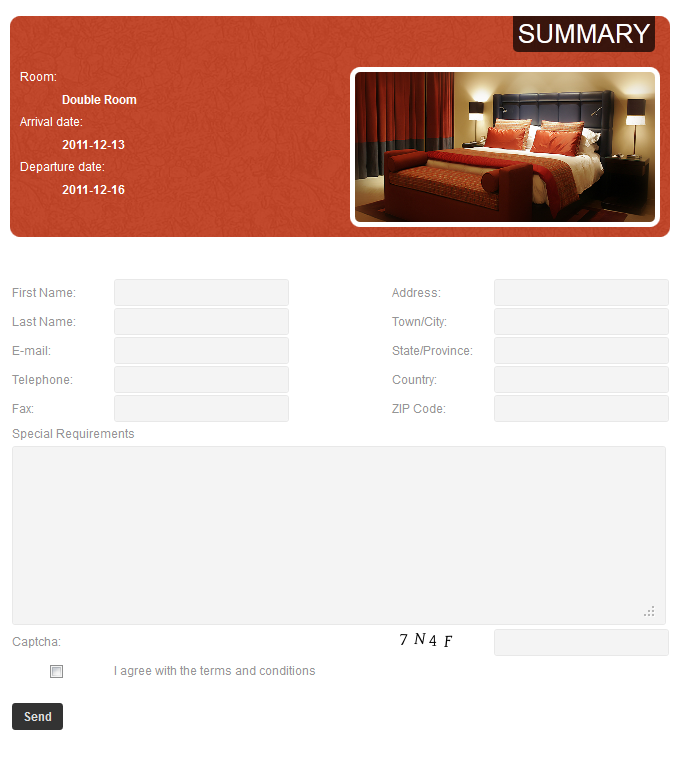 Last step is to properly fill up the user form. After this, mail will come to your specified mailbox with the room booking informaiton provided by customer.
Implementation Notice:
This form uses several plugins, which have to be installed and active in your wordpress site. The plugins used:
- Contact Form 7
- Contact Form 7 Dynamic Text Extension
- Really Simple CAPTCHA
The layout of the contact form and also the mail format is not defaultly provided, because the Contact Form 7 plugin has a default layout of the form. For your comfort we include the code, which you just need to copy&paste in the contact form and the mail part of the Contact Form 7 plugin.
Code for Summary Form Layout:
[frame bgcolor="#d2d6d9" version="light"]
[dynamichidden dynamichidden-715 id:roomThumbCont "CF7_GET key='roomthumb'"]
<div>
<div>
<img id=roomThumb src=imageSource width=250 height=163 /><div><h3>[dynamictext dynamictext-17 uneditable "CF7_GET key='roomname'"]</h3>
<strong>Arrival date:</strong>
<p>[dynamictext dynamictext-45 uneditable "CF7_GET key='from'"]</p>
<strong>Departure date:</strong>
<p>[dynamictext dynamictext-491 uneditable "CF7_GET key='to'"]</p>
</div>
</div>
</div>
<h2>Please fill Your Contact Information to complete the Order:</h2>
<table>
<tr>
<td>First Name:</td>
<td>[text* your-name]</td>
<td></td>
<td>Address:</td>
<td>[text* your-address]</td>
</tr>
<tr><td>Last Name:</td>
<td>[text* your-surname]</td>
<td></td>
<td>Town/City:</td>
<td>[text* your-city]</td>
</tr>
<tr><td>E-mail:</td>
<td>[text* your-email]</td>
<td></td>
<td>State/Province:</td>
<td>[text* your-state]</td>
</tr>
<tr>
<td>Telephone:</td>
<td>[text* your-phone]</td>
<td></td>
<td>Country:</td>
<td>[text* your-country]</td>
</tr>
<tr>
<td>Fax:</td><td>[text* your-fax]</td>
<td></td><td>ZIP Code:</td>
<td>[text* your-zip]</td></tr>
<tr>
<td colspan="5"> </td>
</tr>
<tr>
<td colspan="5">Special Requirements</td>
</tr>
<tr>
<td colspan="5">[textarea* your-options]</td>
</tr>
<tr>
<td colspan="5"> </td>
</tr>
<tr>
<td colspan="5"><strong>Security Check</strong> (please enter text below)</td>
</tr>
<tr>
<td>[captchac captcha-330]</td>
<td>[captchar captcha-330]</td>
<td></td>
<td>[acceptance acceptance-1 default:on]</td>
<td>I agree with the terms and conditions</td>
</tr>
<tr>
<td colspan="5">[submit "Send"]</td>
</tr>
</table>
[/frame]
Code for Mail Layout:
[frame bgcolor="#d2d6d9" version="light"]
From: [your-name] <[your-email]>
Subject: [your-subject]
Room: [dynamictext-17]
Date From: [dynamictext-45]
Date To: [dynamictext-491]
First Name: [your-name]
Last Name: [your-surname]
E-mail: [your-email]
Telephone: [your-phone]
Fax: [your-fax]
Address: [your-address]
Town/City: [your-city]
State/Province: [your-state]
Country: [your-country]
ZIP Code: [your-zip]
Special Requirements
---------------------------------------------------------------------------------
[your-options][/frame]
THE SET-UP
Guesthouse Wordpress Theme - Roomviewer Set Up Process - Homepage
Guesthouse Wordpress Theme - Summary Form Set Up Process
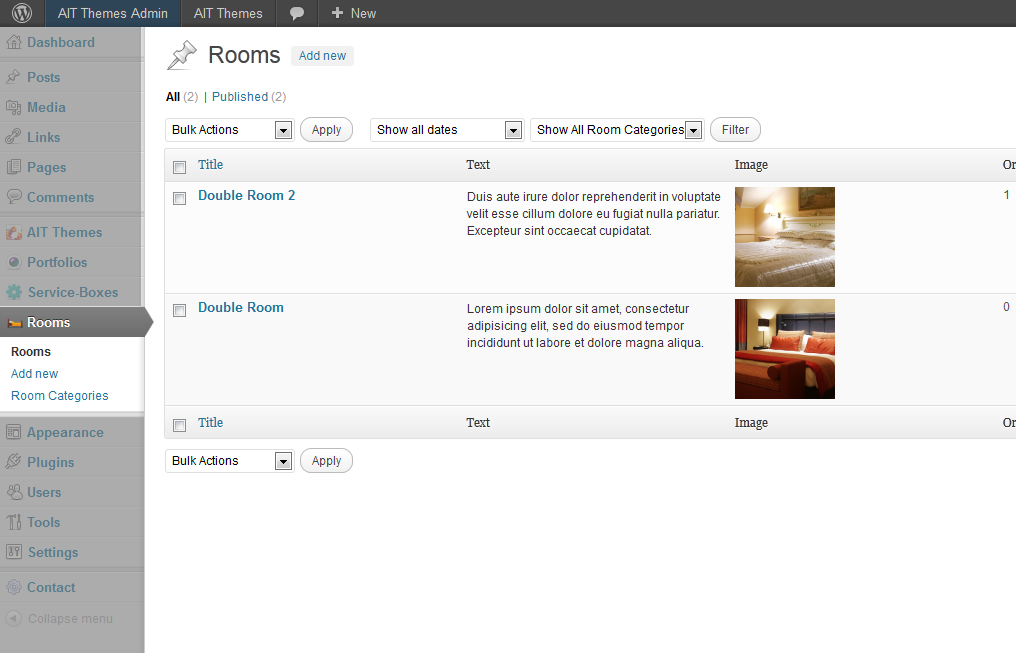
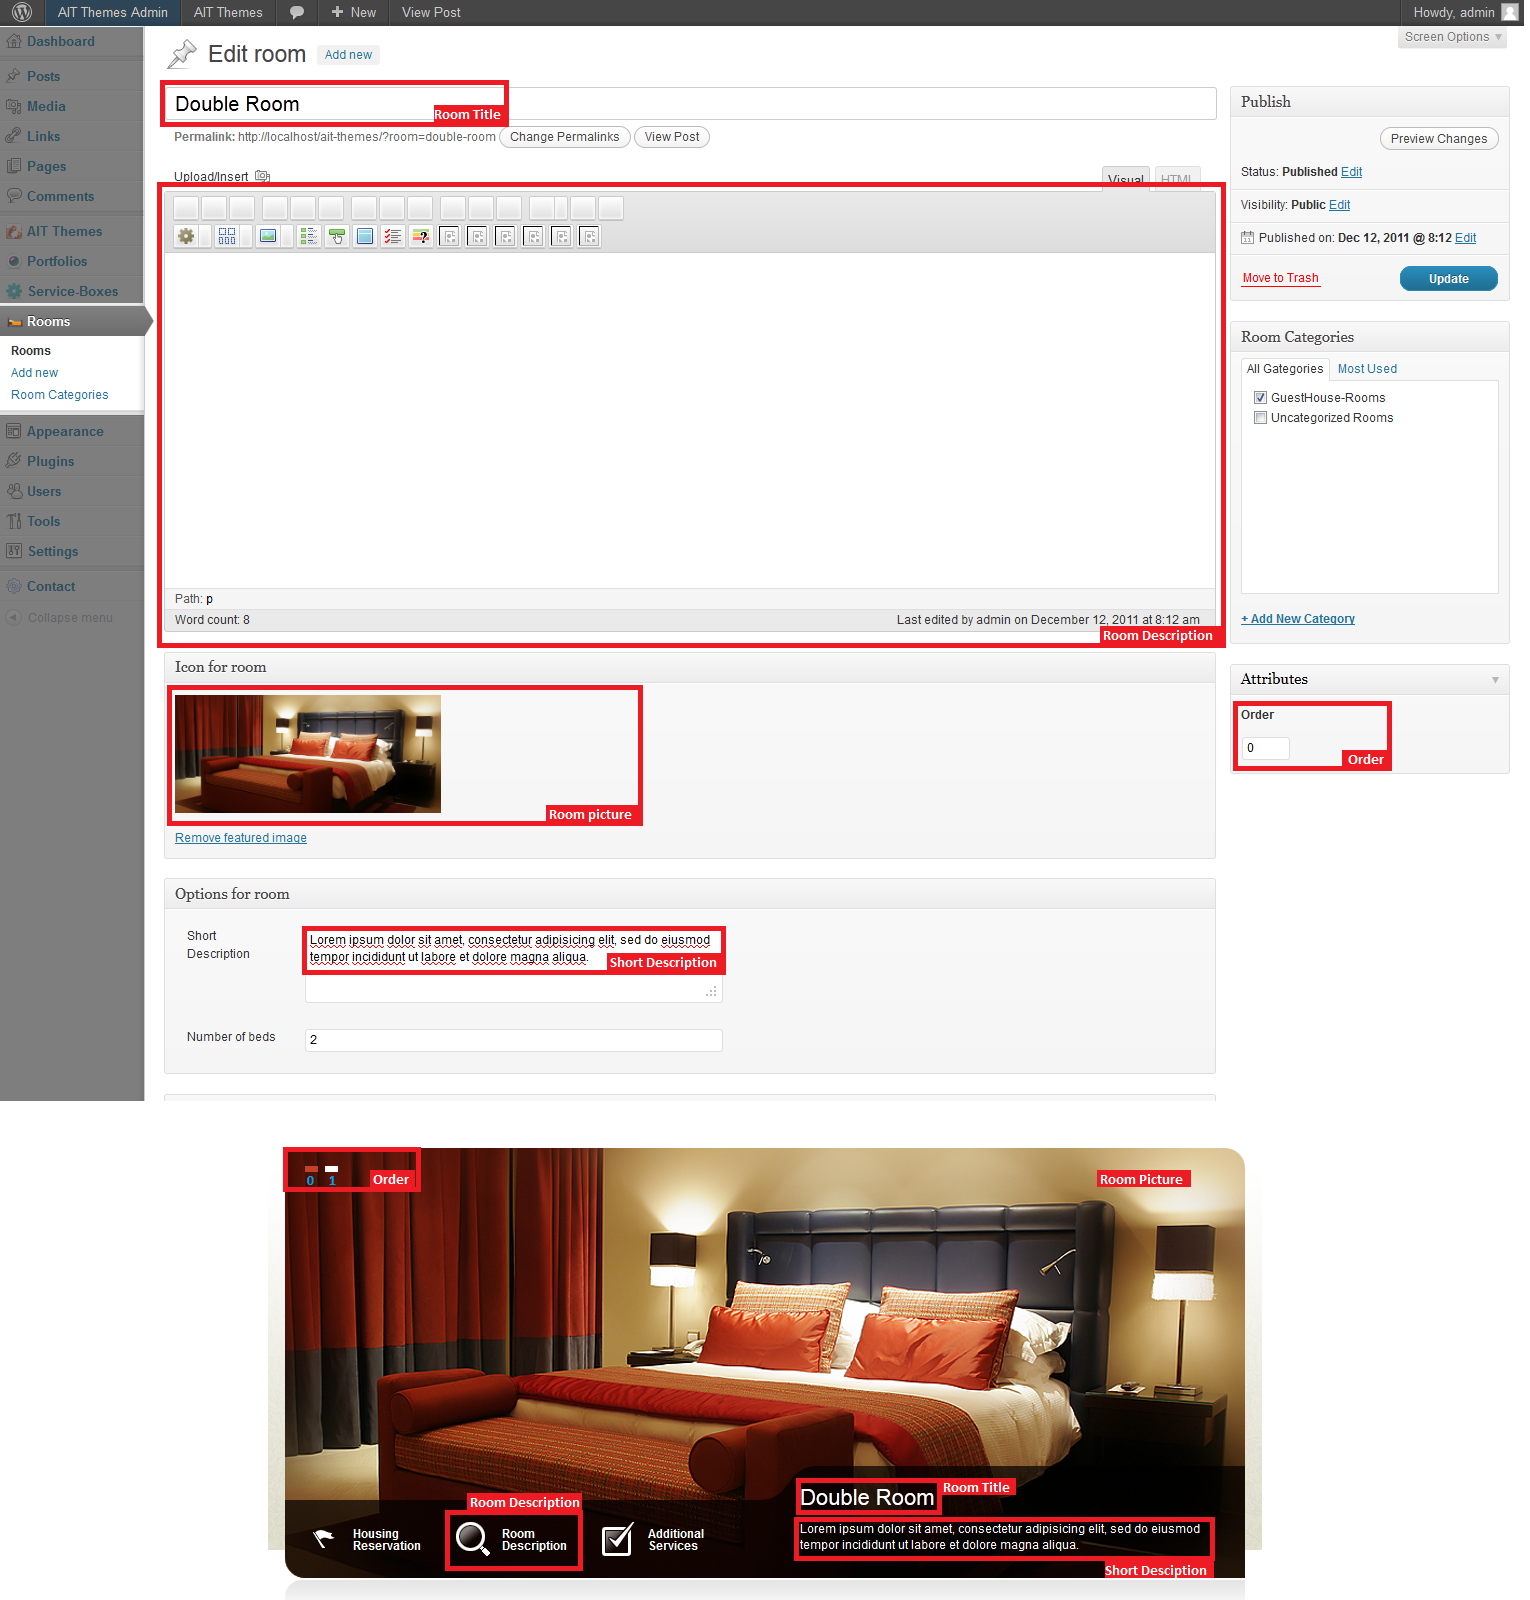
First of all, we must introduce our new custom type Room. You can find it in the left menu of the wordpress admin. Visually looks like this:
The room adding is as simple as to create a new page. WordPress lets us buid on its framework to comfort you the most. The room creation is shown in the picture:
After this, the room is ready to make your hotel, into the 5* hotel with the preview, easy to use presentation. Have fun =) and if you face any problem, we will be glad to assist you in any trouble you encounter on the support forum.
4. Guesthouse homepage layout
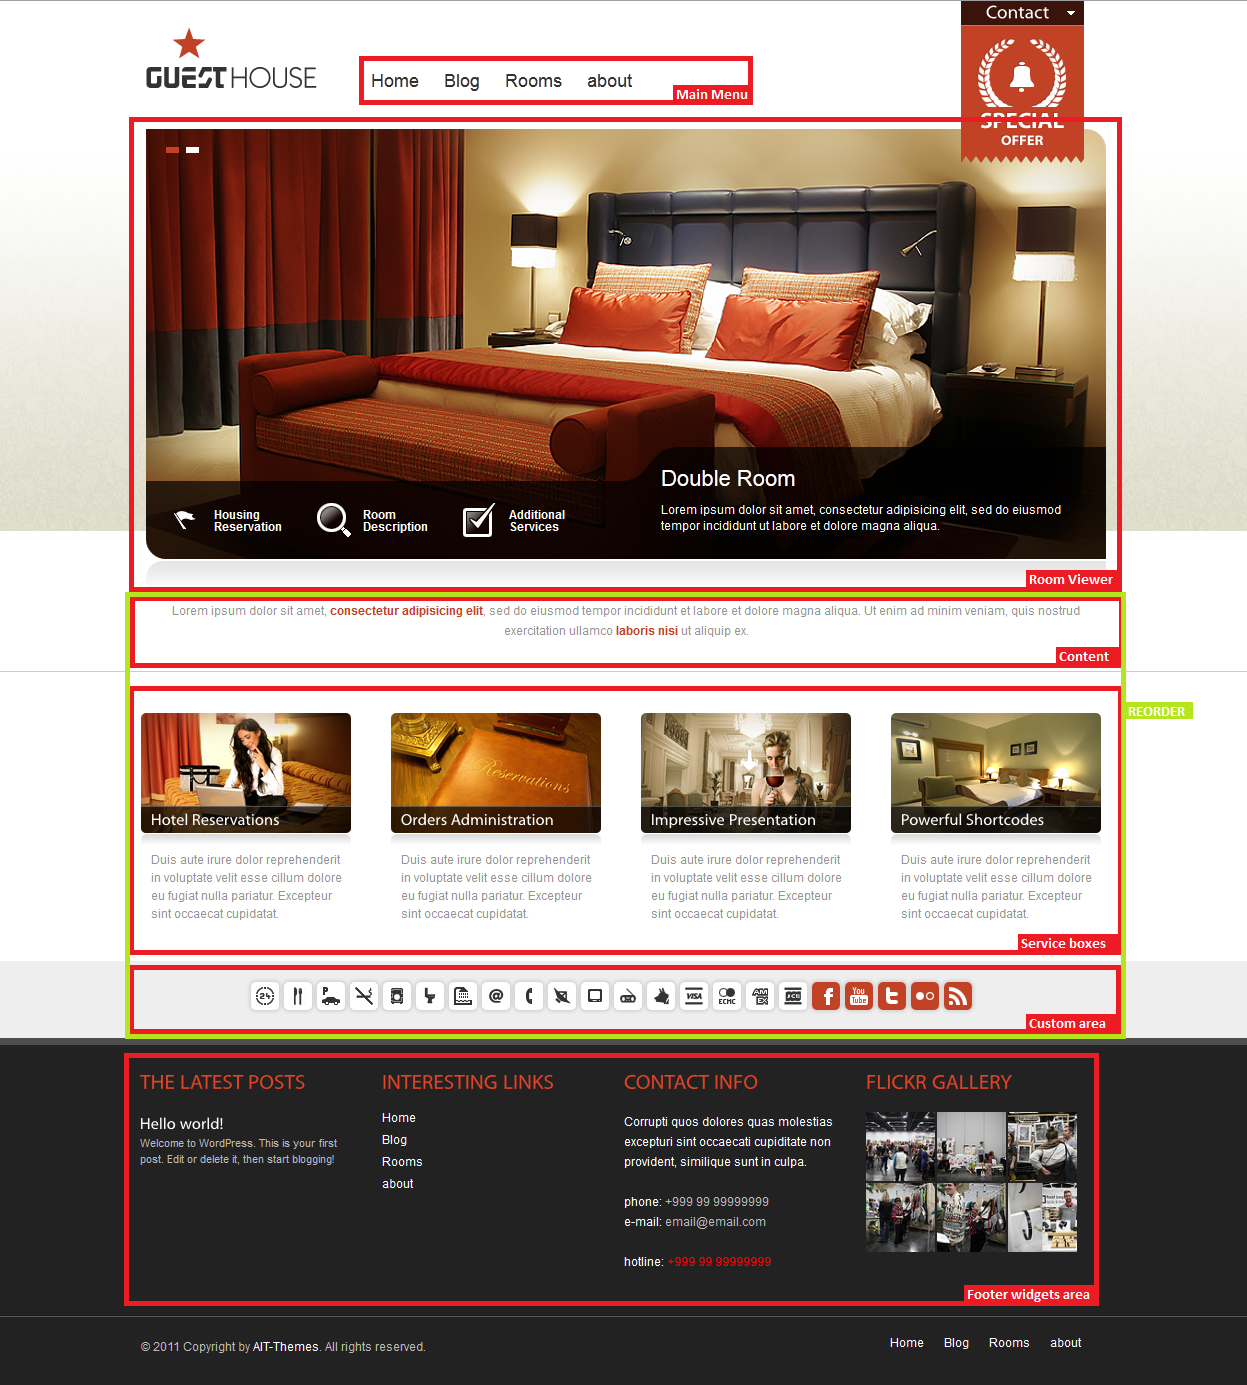
The Guesthouse WordPress template includes many of the features we have implemented into our themes. This comes with following features:
- Drop-down panel
- Room viewer
- Service boxes
- Custom area
- Content reorder
In the next picture, we ilustrate the look of the homepage
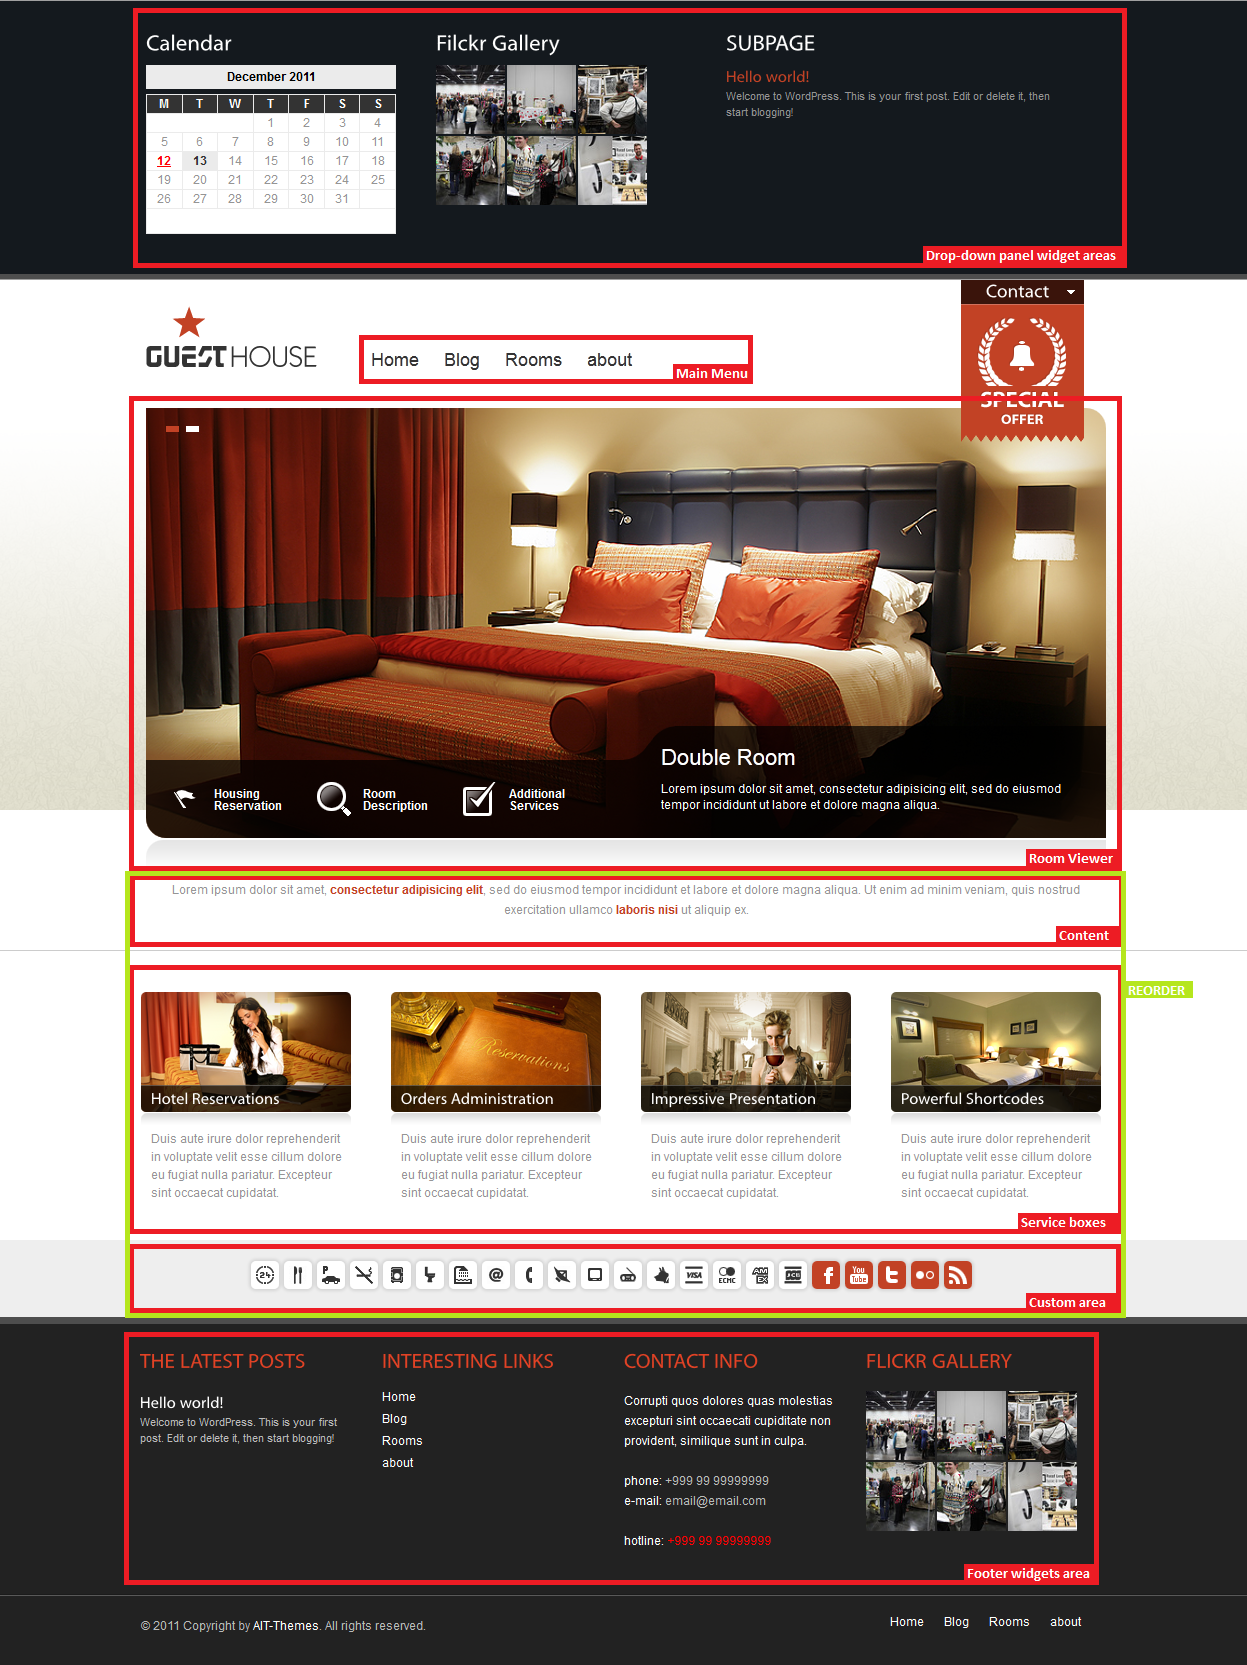
The Drop-down panel comes with 3 widget areas and with a slide type animation effect. Effect and the Drop-down content is accessible by clicking on the Contact in the ribbon. The Look of the homepage with the dropdown visible is illustrated in the picture below.
5. How to set / change social and tooltip icons
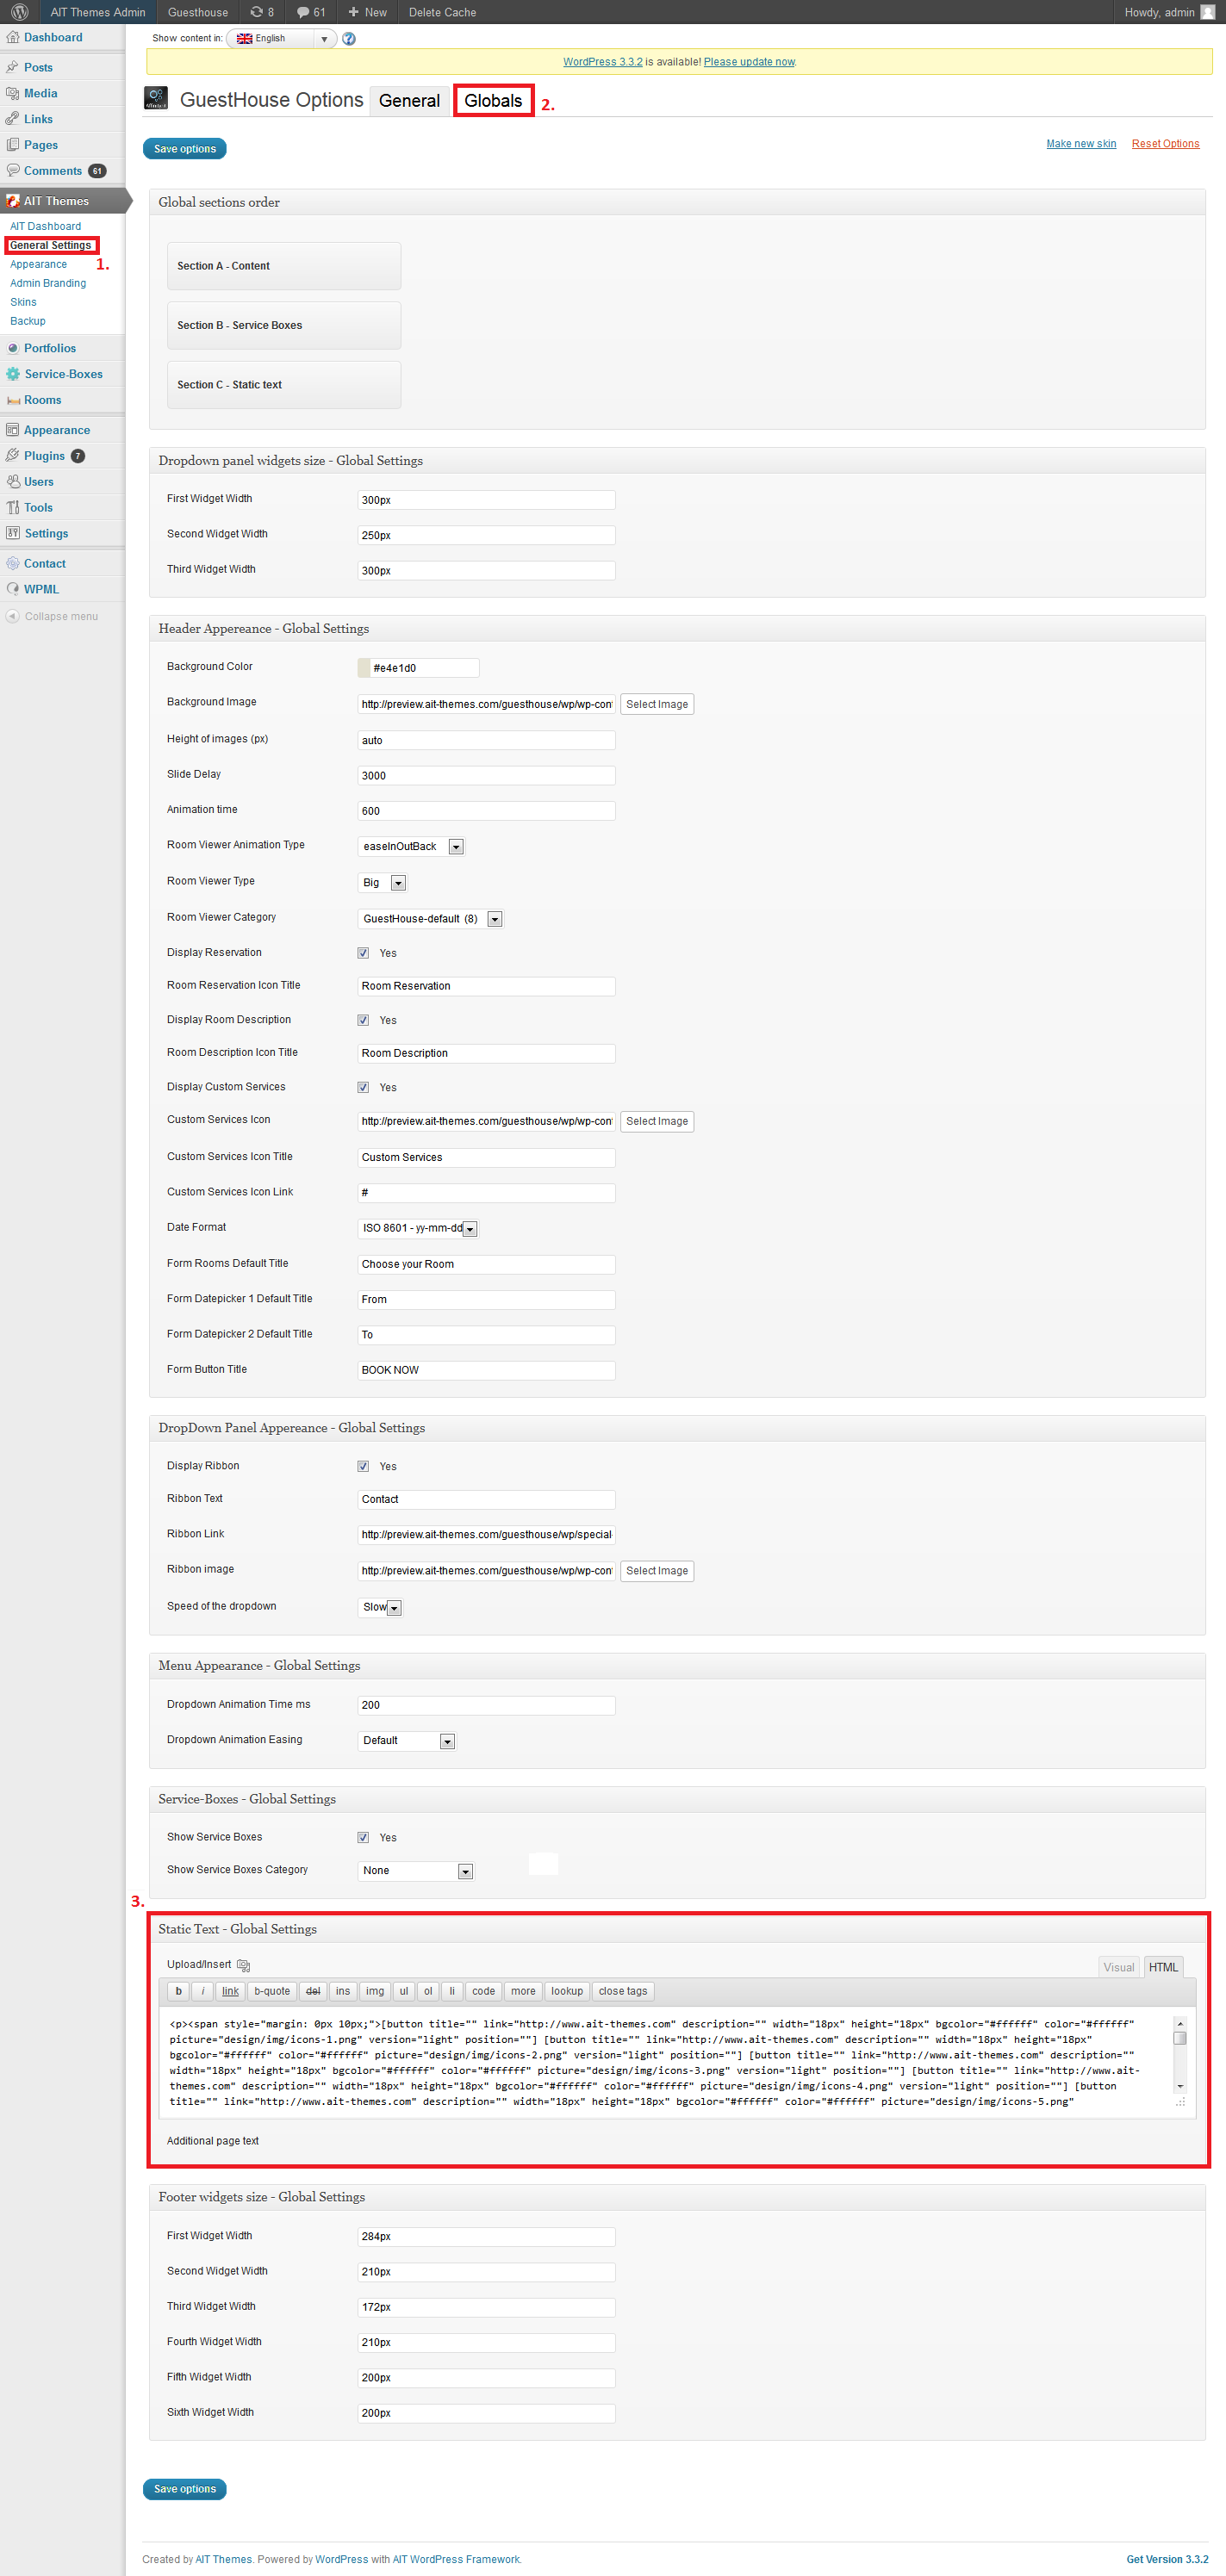
Social and Tooltip Icons you can easily change in 3 Steps:
1. General Settings
2. Switch to Globals
3. Scroll down to field "Static Text - Global Settings"
6. Creating Custom Menus
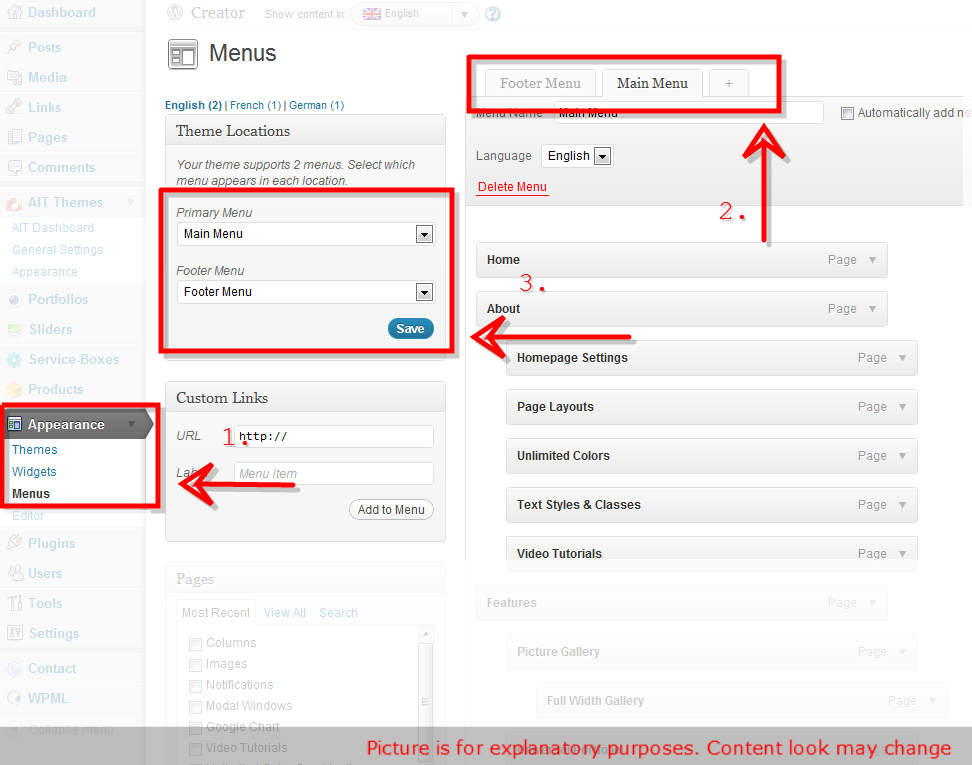
1. Navigate to: Appearance Menus
2. Now you can choose any items like pages, categories or custom links from the left column them to add to Main menu or Footer menu.
After you have added in your items, you can use drag and drop to order individual items. You can also click each item to reveal additional configuration options.
When you have finished building your custom menu, make sure you click the Save Menu button.
3. Its also important to define which menu will become your Primary menu and which one will be a Footer menu. This can be set in Theme Locations box on the left hand side.
7. Setting Up Portfolio
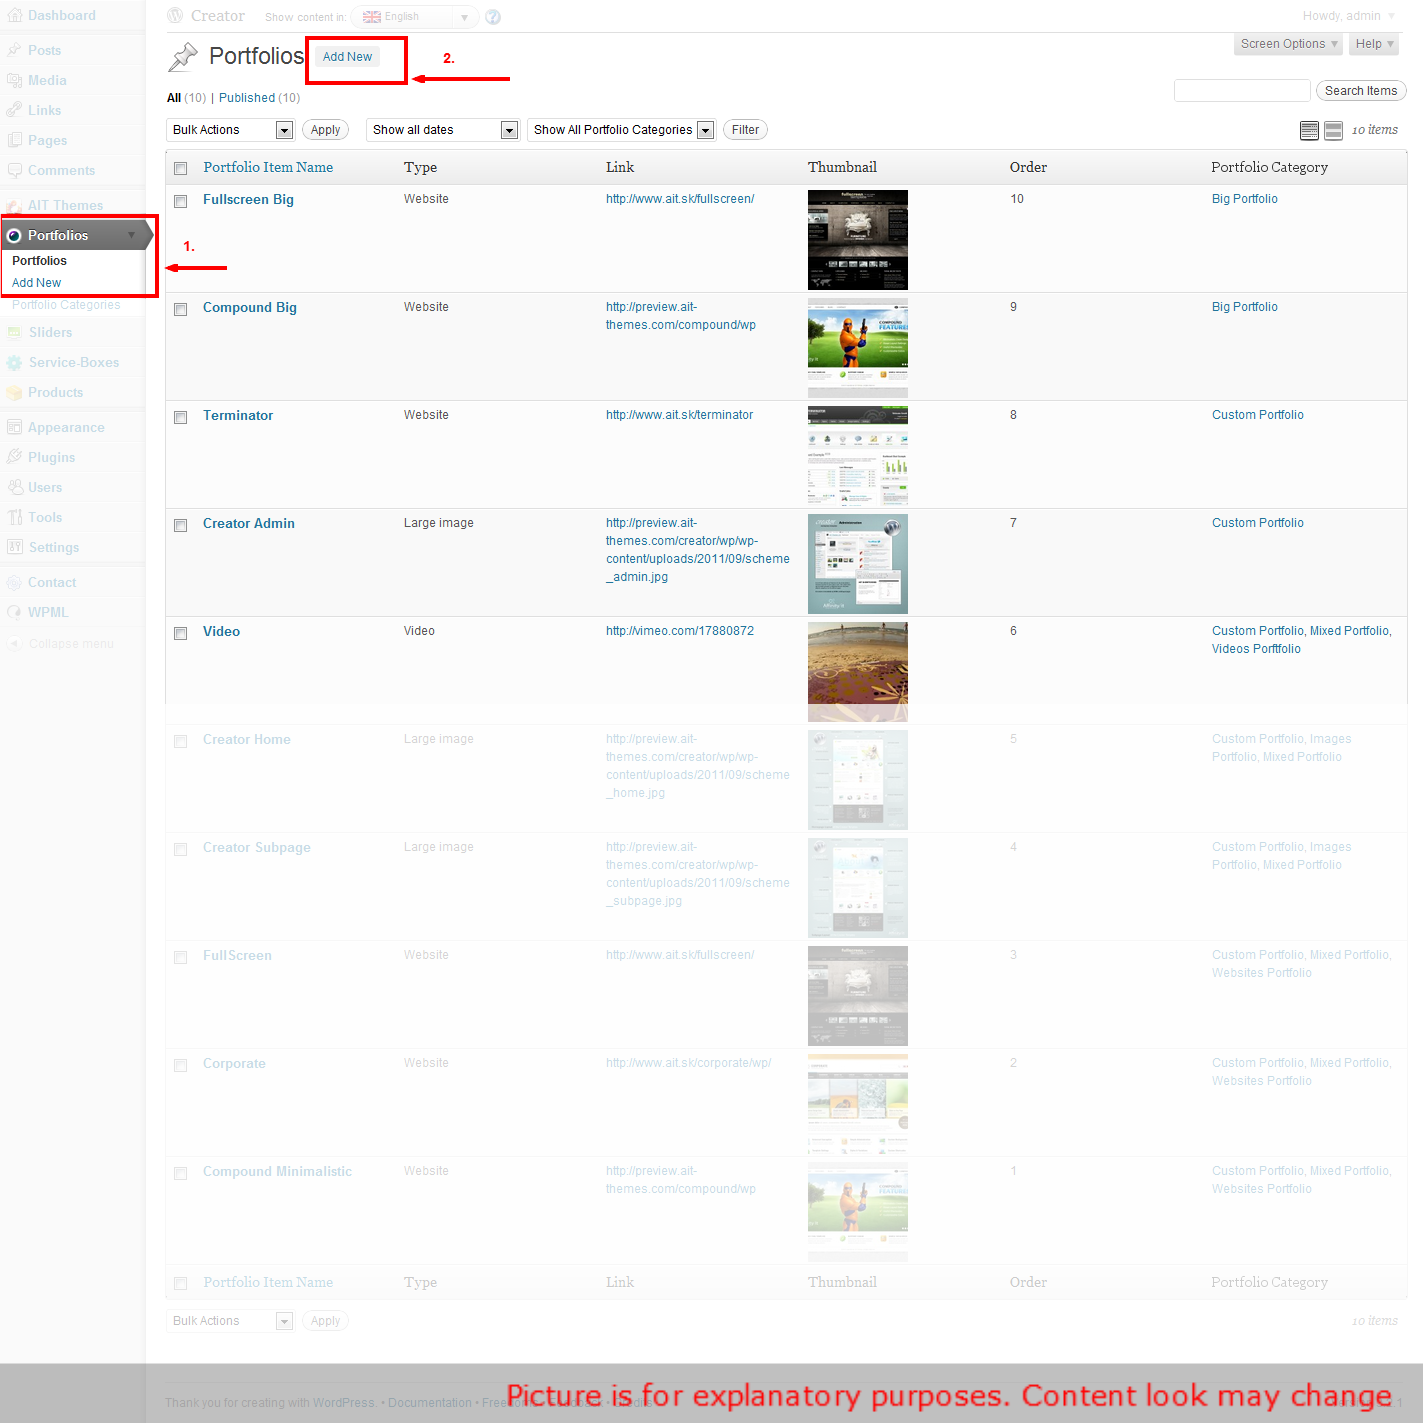
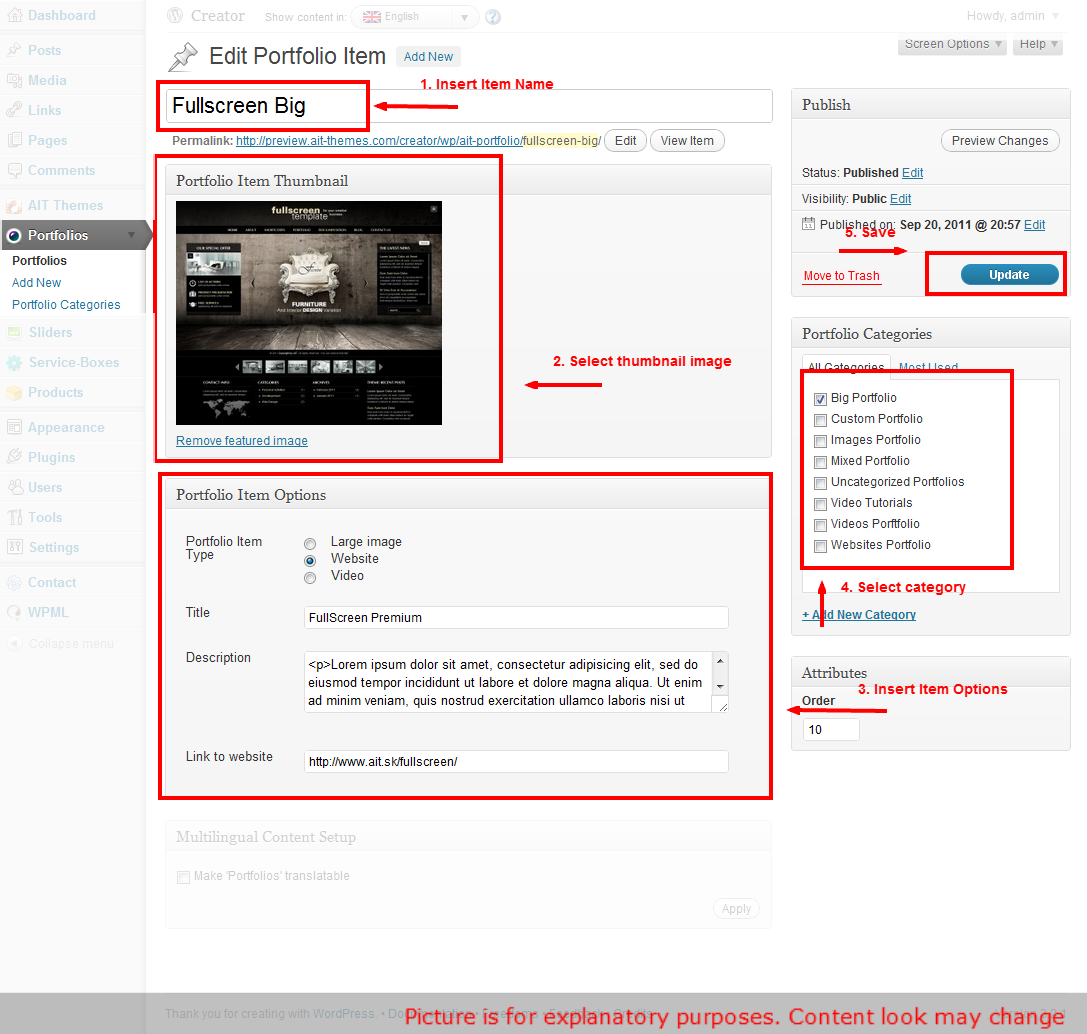
Theme provides powerful custom built Portfolio. You can use it to display various item types like images, videos or websites. You can simply add in new items to portfolio by click on Portfolios -> Add new Item from WP-Admin and then manage all items exactly like standard wordpress posts or pages.
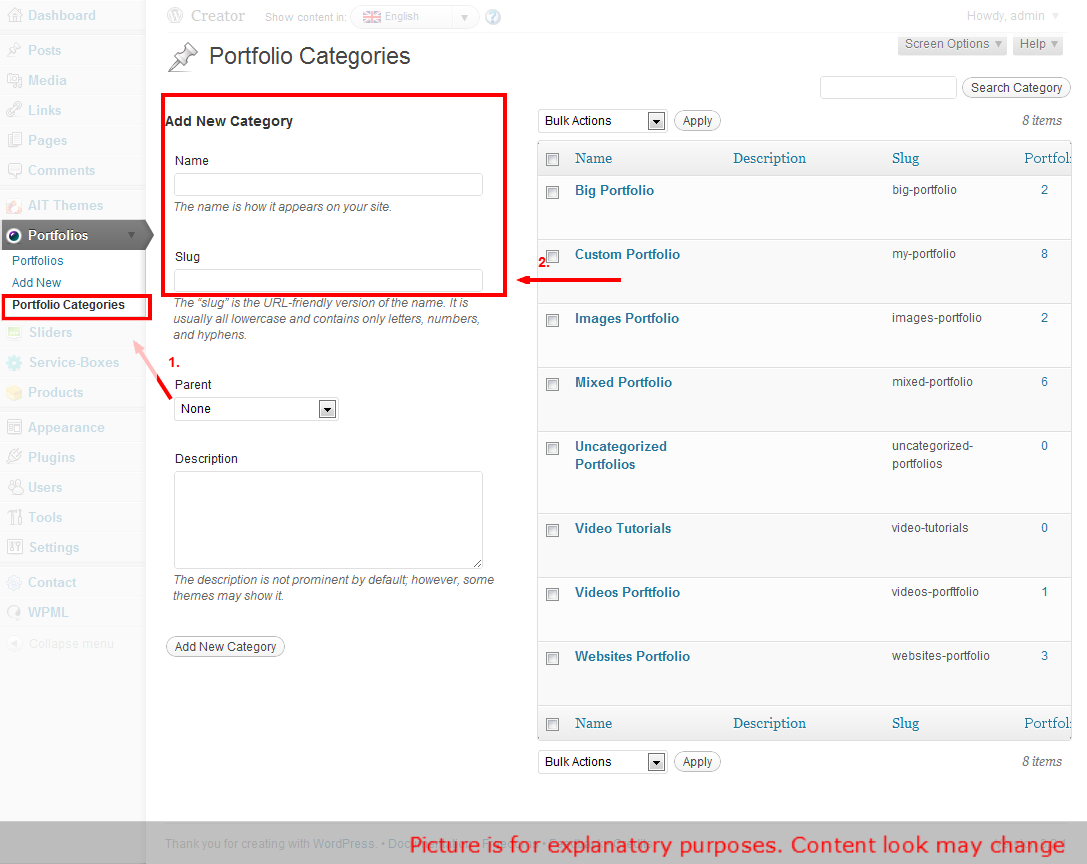
Portfolio items can stored into unlimited number of Portfolio Categories. You can then select which portfolio youd like to include on a specific page or post. To manage portfolio categories please navigate to Portfolio -> Portfolio Categories from WP-Admin.
8. Setting Up Contact Form
For contact form we use a free wodpress plugin called Contact Form 7. More info about this plugin can be found on the following url: http://contactform7.com/
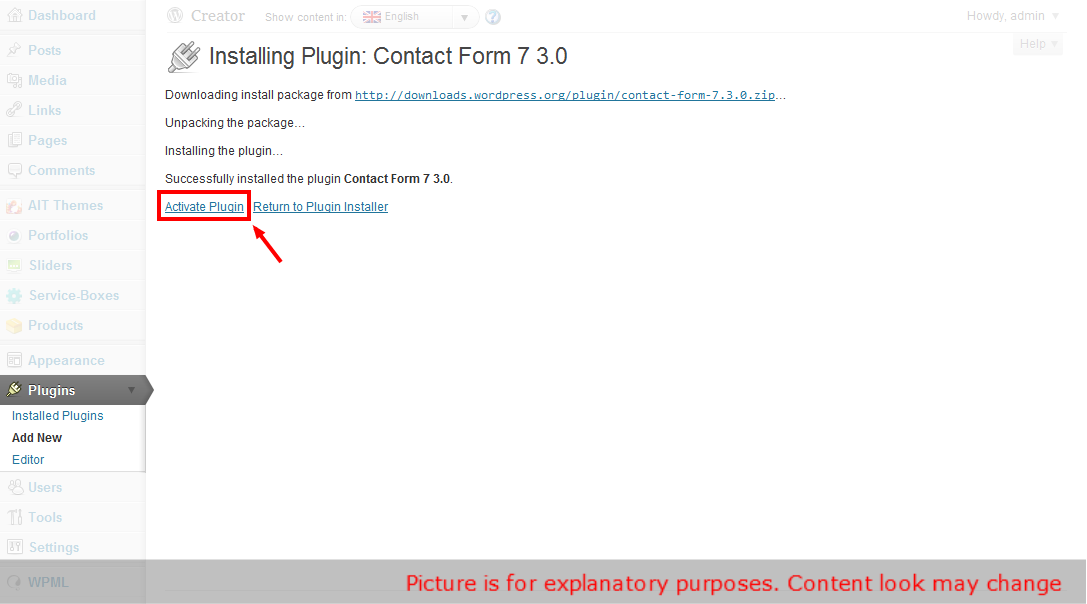
To install this plugin go to Plugins > Add new and type into search bar Contact Form 7. Find the plugin and click to Install Now.
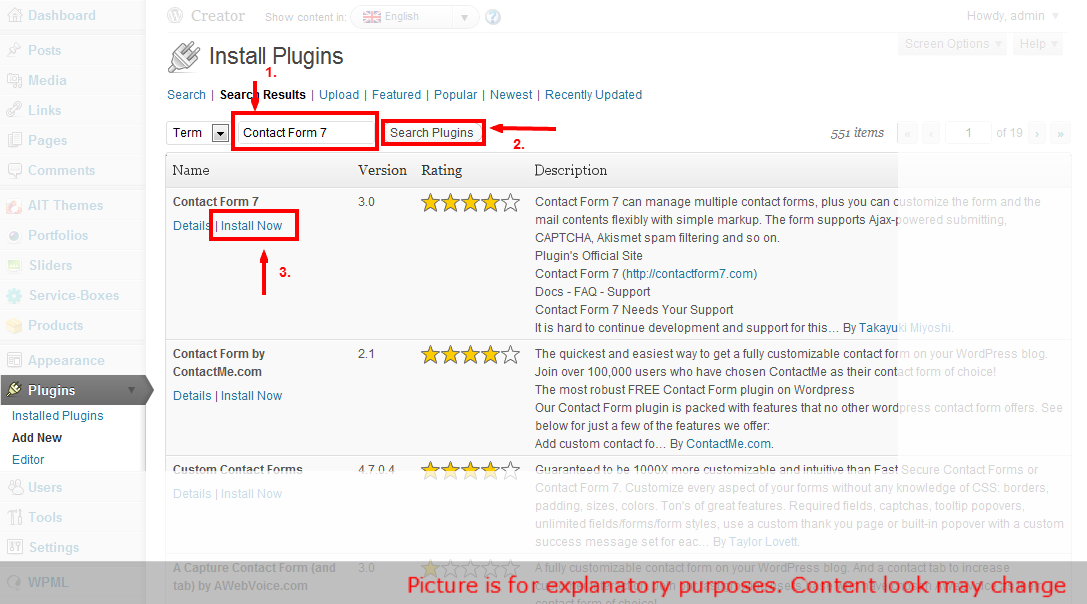
Then click Activate Plugin. A new menu section will be created at the left hand side. Itll be calledContact.
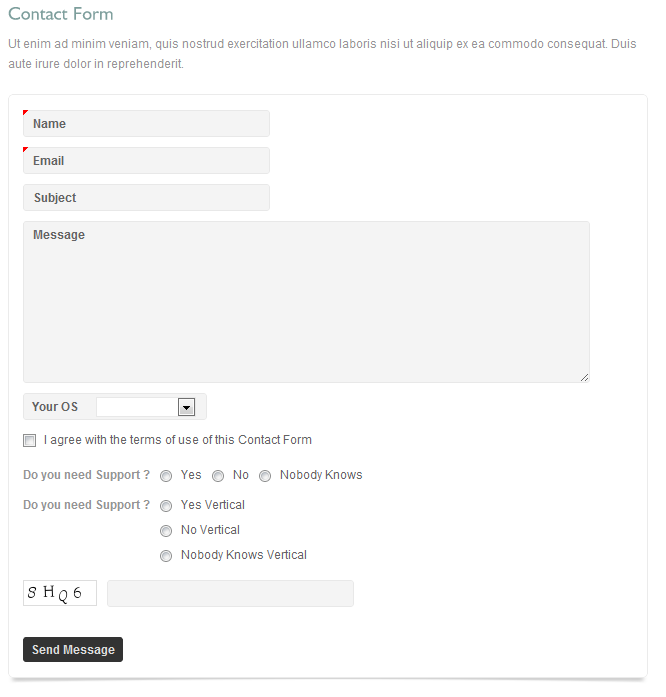
If you want to have the same contact form like we have at our demo site, you can also install Really Simple CAPTCHA plugin. Code that we use on our demo site is as follows. Please insert it into Form box in Contact settings page:
<p>
<label for="your-name">Name <span>*</span></label>[text* your-name]
</p><p>
<label for="your-email">Email <span>*</span></label>[email* your-email]
</p><p>
<label for="your-subject">Subject</label>[text your-subject]
</p><p>
<label for="your-message">Message</label>[textarea your-message]
</p><p>
<label for=" slect-os">Your OS</label>[select slect-os " " "Windows XP" "Windows 7" "Apple" "Linux"]
</p><p>
[checkbox* agreement use_label_element exclusive "I agree with the terms of use of this Contact Form"]
</p><p>
<span>Do you need Support ?</span>[radio radiobuts use_label_element "Yes" "No" "Nobody Knows"]
</p><p>
<span>Do you need Support ?</span>[radio radio-vertical use_label_element "Yes Vertical" "No Vertical" "Nobody Knows Vertical"]
</p><p>
[captchac captcha-1] [captchar captcha-1]
</p><p>[submit "Send Message"]</p>
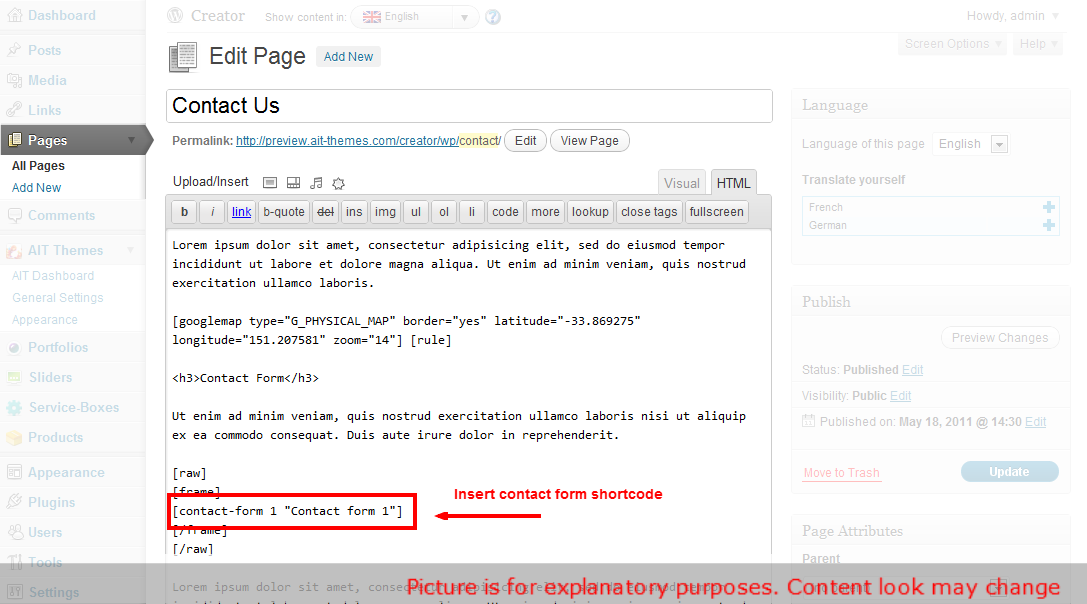
Once you have your contact form created, you can insert into to any of you pages with a simplecontact-form shortcode:
9. Translating theme to other languages
You can translate your website to any language. Theme is WPML wordpress plugin compatible, gettext file is also included. Gettext PO file can be easily edited within wordpress admin usingCodestyling Localization. You can also use standalone software like poEdit or any other you like.
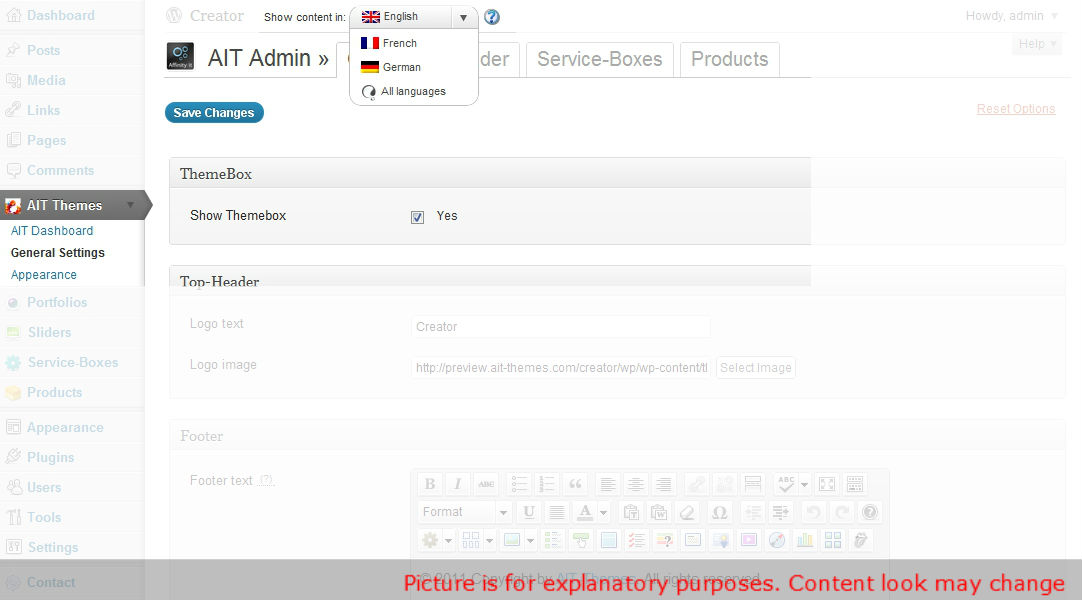
When you have this wordpress plugin then go to Plugins > Add New > Upload, upload and activate your WPML package. In WP-Menu should appear WPML button. Click on it and choose languages and default language. At top of Admin should appear language selector. Then you can simply switch between your languages and set up custom admin values for every language.
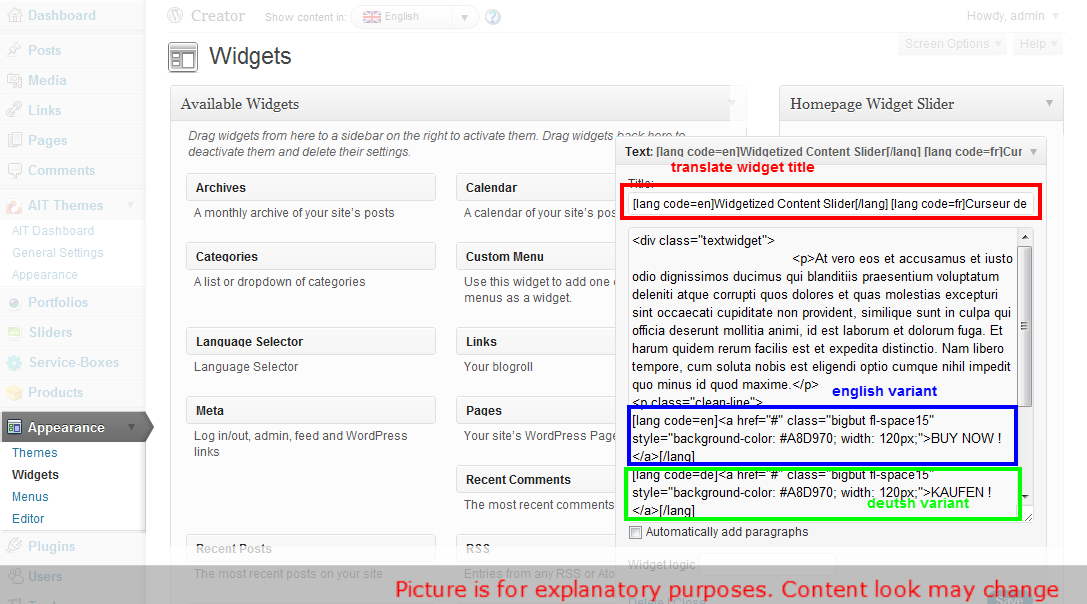
You can translate widgets and widget titles too, but I must use lang shortcode: [lang code=en]Text[/lang]
10. Displaying Portfolio Items
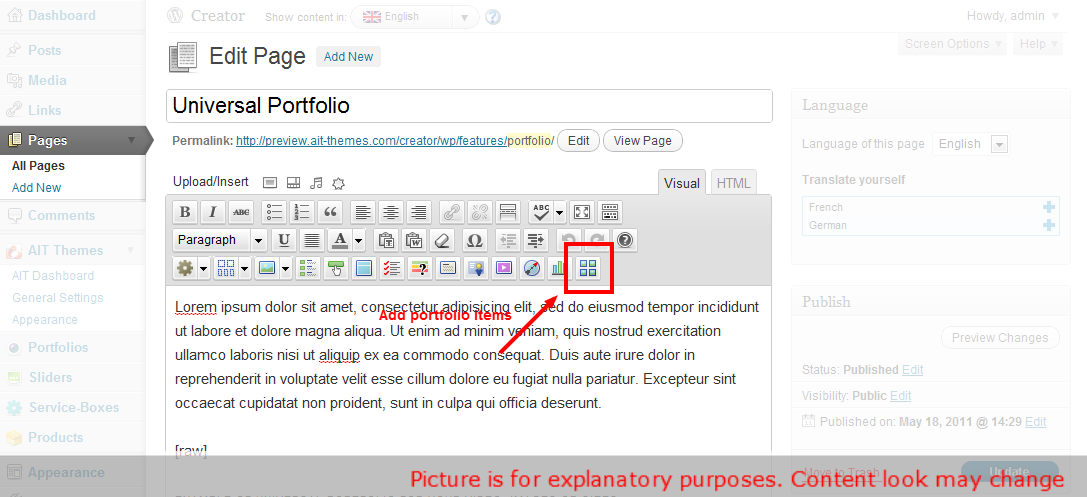
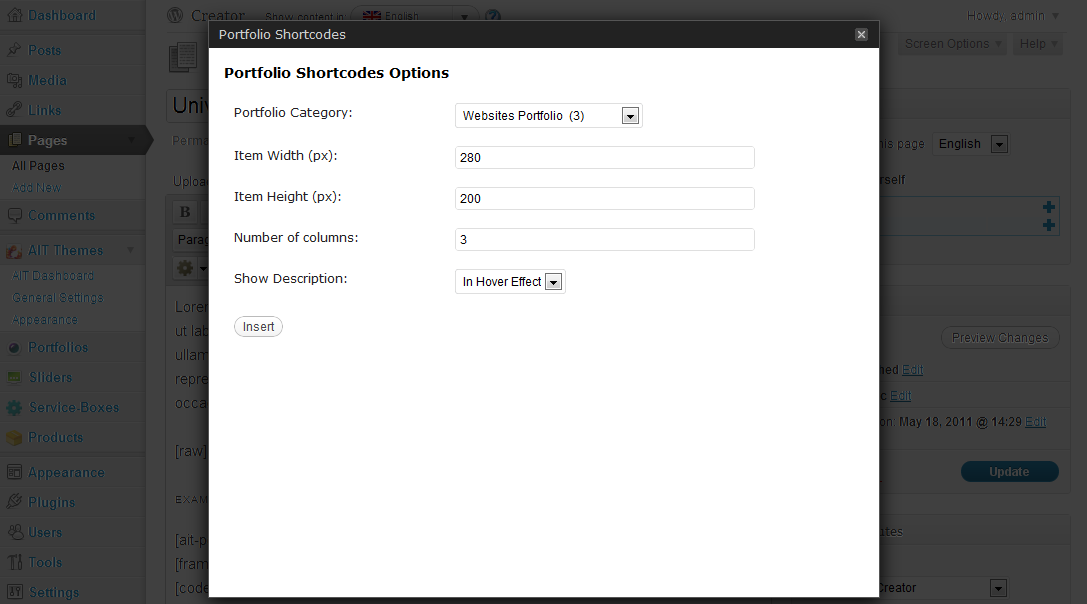
You can insert custom portfolio items to any post or page with a handy custom built button in wordpress WYSIWYG editor:
From pop-up dialog you can select which portfolio category you want to show in post or page, specify width and height of portoflio items, configure how many columns should portfolio have and also specify where to show item description.
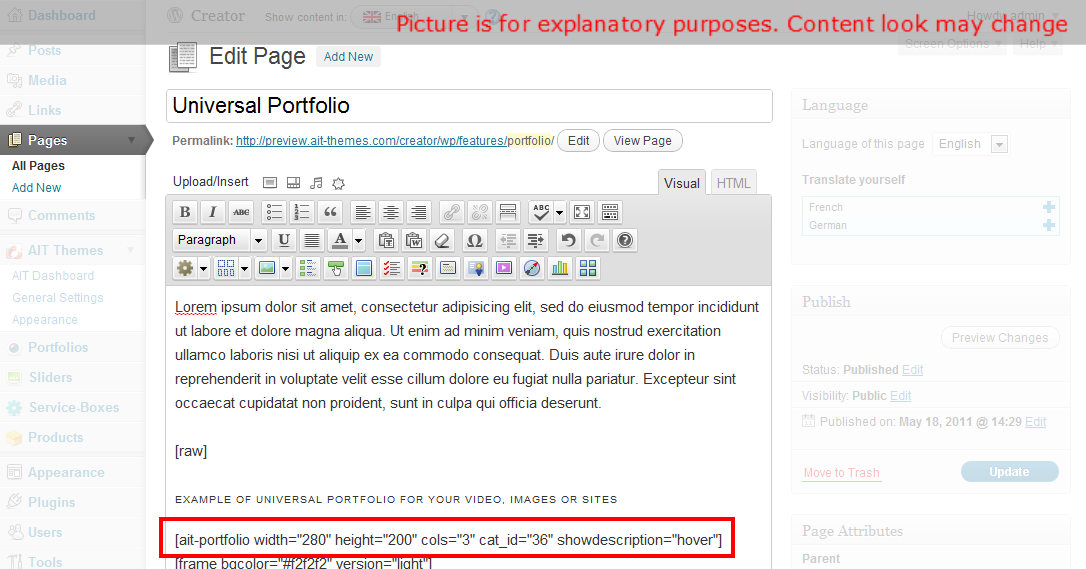
When you click to Insert button, the shortcode will be automatically inserted into content of your post or page:
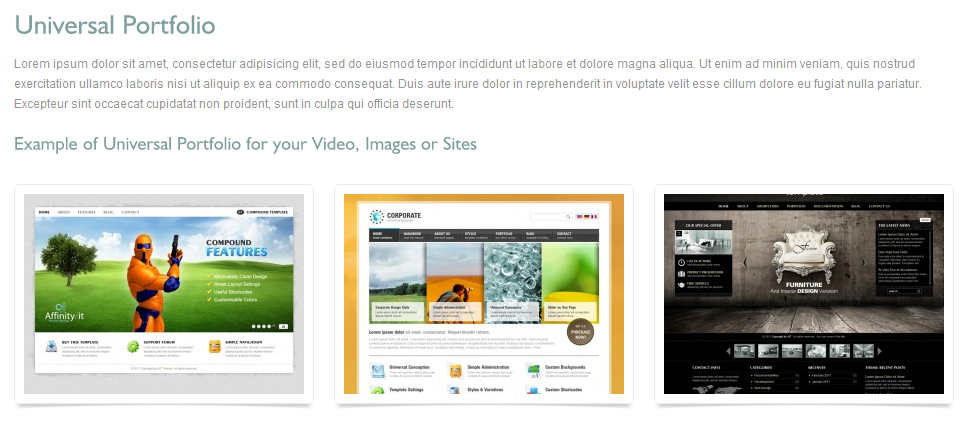
Now you can preview your changes on the frontend part.
11. Inserting Service Boxes
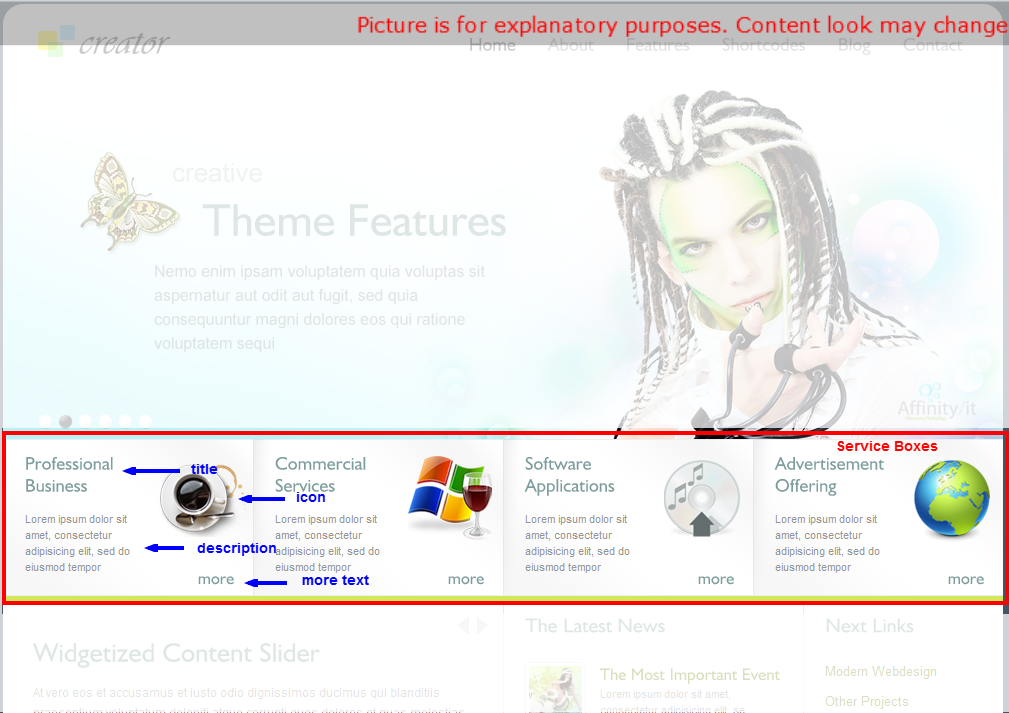
We have prepared an easy tool how to promote your services. Service boxes can be placed on any post or page.
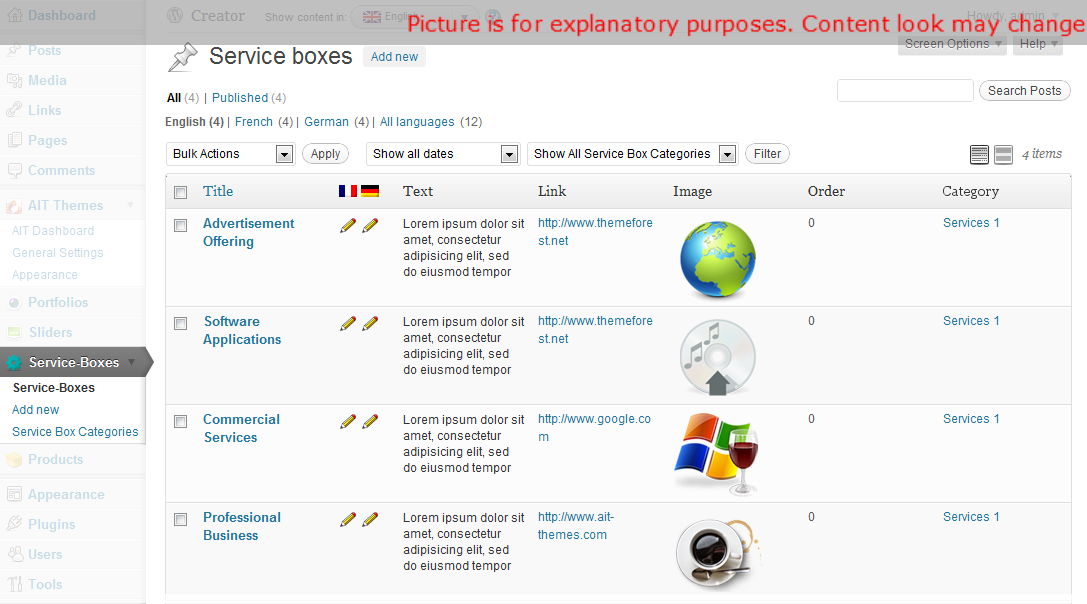
If you want to add service boxes to you website, click on Service-Boxes from WordPress Menu.Creating service boxes is similar to creating standard posts in wordpress. Each service box item can have:
- Title
- Link
- Description Text
- Icon
- More text
- Custom Width (optional).
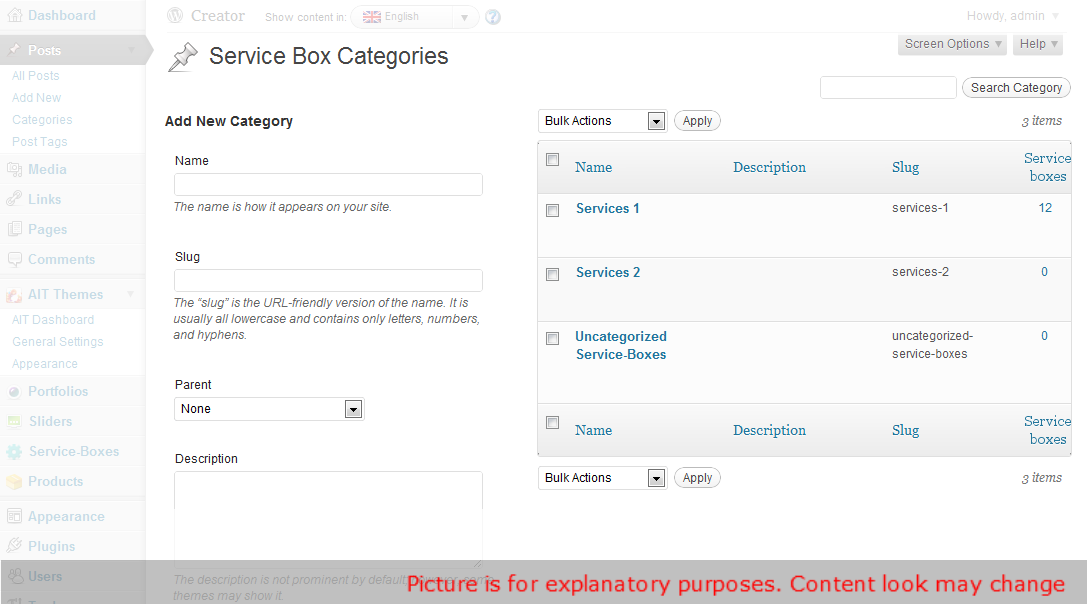
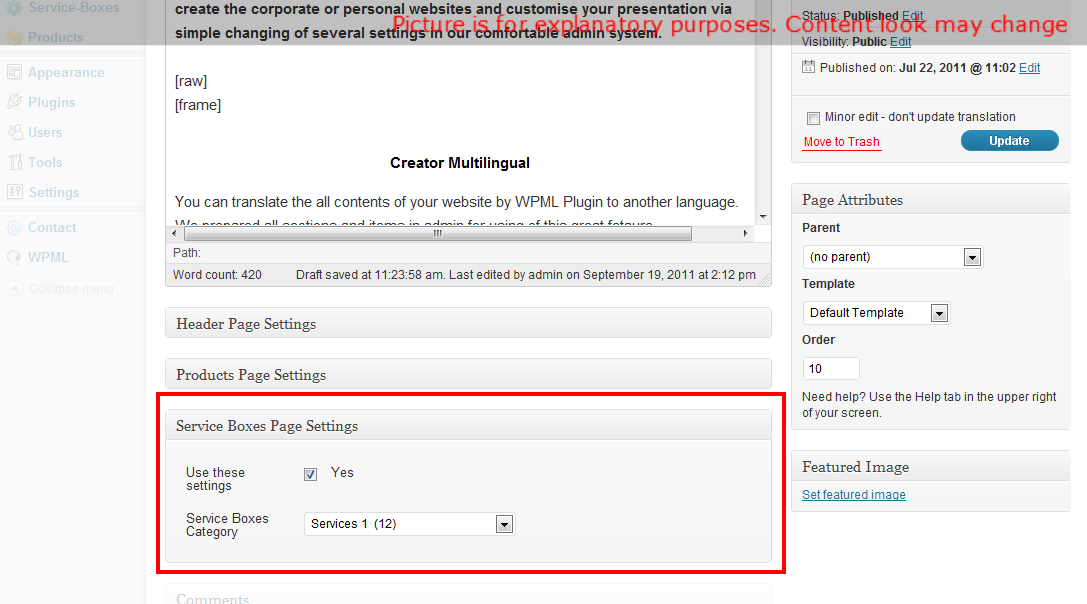
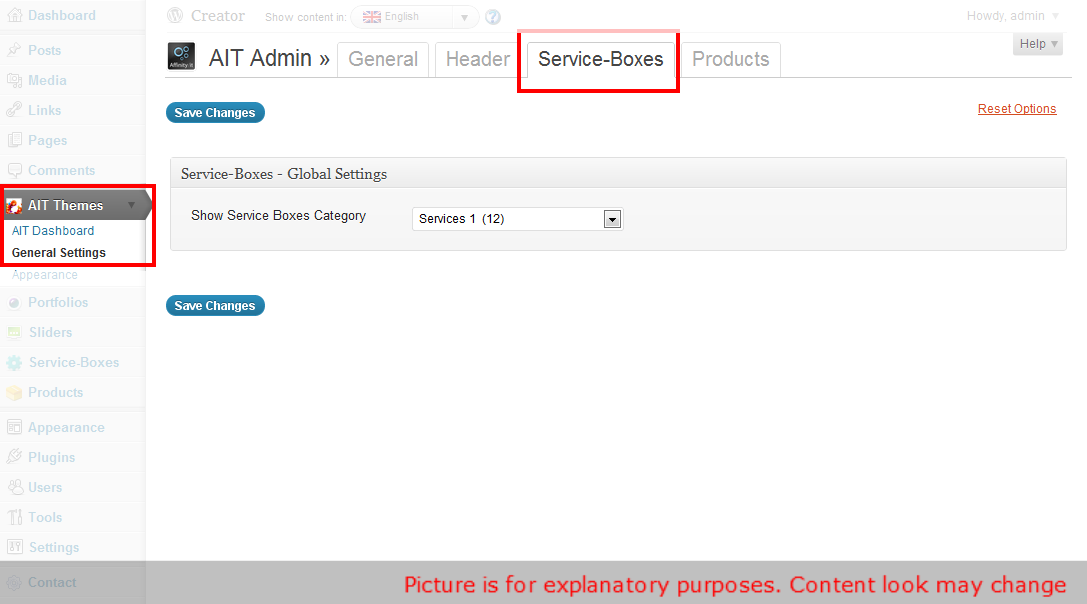
You can create various service boxes categories and then show only particular service box category on any post or page. You can also set these settings globally that means itll show on every page.
12. Booking Calendar Plugin Customization
We have also prepared custome css stylesheet for Booking Calendar Plugin.
After Downloading, Installing and Activating Booking Calendar Plugin, you have to make few more steps:
- From GuestHouse Template Directory \ Plugins \ Booking Calendar Copy
- client.css and overwrite the client.css in wp-content \ plugins \ booking \ css
- guesthouse.css and paste into wp-content \ plugins \ booking\ css \ skins
- In the WP Admin Area open Booking > Settings and set Calendar skin: Guesthouse
- You need to have most recent version of css template file style.less.css
13. Advanced users: Editing HTML files
If you are an advanced user and would like to edit HTML directly, please be advised that we use a MVC architecture that allowed us to completely separate HTML content from standard WordPress PHP files.
- HTML templates can be found in folder ./Templates
- CSS is in file style.less.css, please note that style.css is generate dynamically and all your changes will be therefore deleted
You can read more about our templating engine WpLatte on the following url.
14. Editable custom type
[notification type="attention"]!!! This functionality is avalaible from Guesthouse version 2.0 !!![/notification]
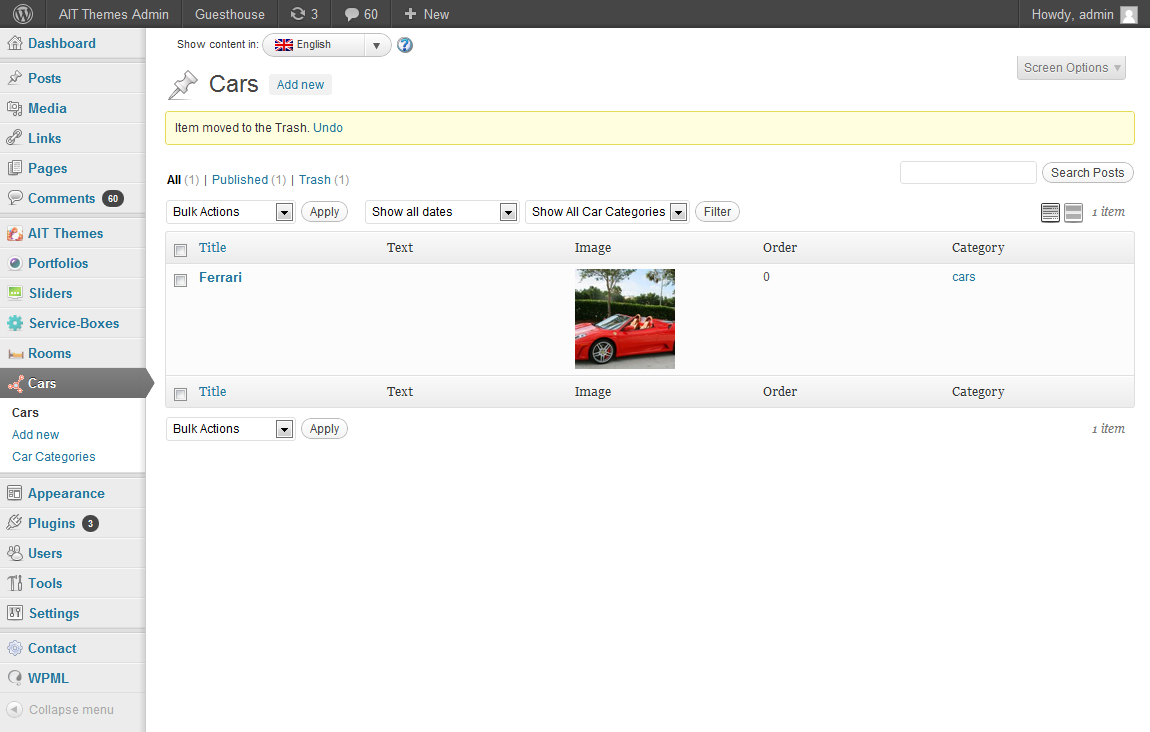
This custom type has special functionality, because it is editable directly from the wordpress admin. The purpose of this custom type is to provide a general purpose solution to your business. For example it can be used to book boats, bikes, cars, planes and any other of your choice.
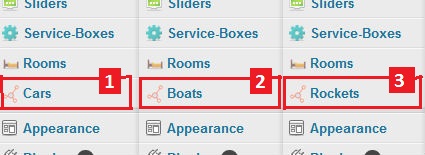
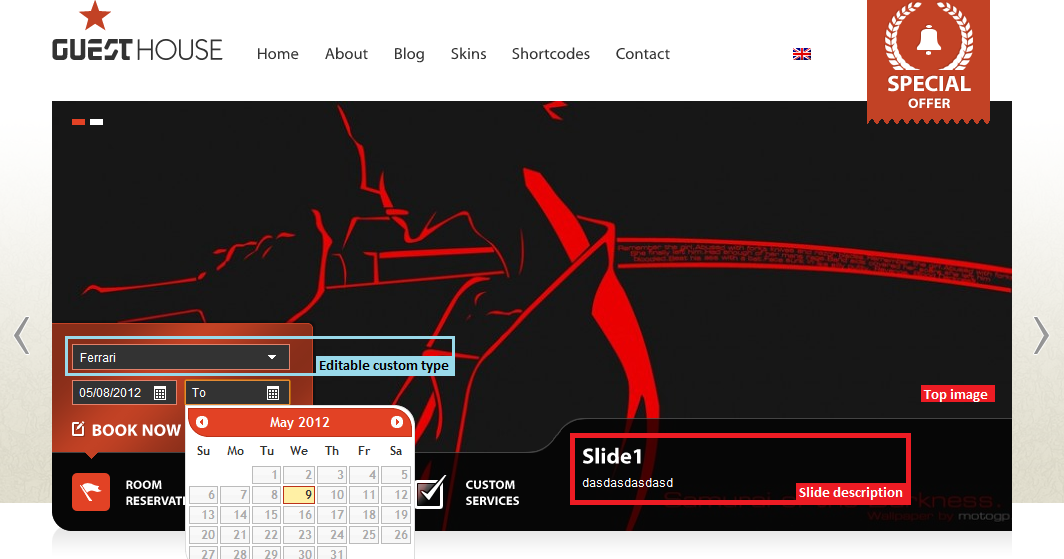
As you can see in the picture this custom type can have any name you want.
Renaming of the custom type is avalaible in the Reservation module
Items in the editable custom type provide these properties:
- Title - Title of the item
- Content - Description of the item
- Short description - The short description
- Count - Number of the providable items
- Featured image - Item image
15. Guesthouse reservation module setup
[notification type="attention"]!!! This functionality is avalaible from Guesthouse version 2.0 !!![/notification]
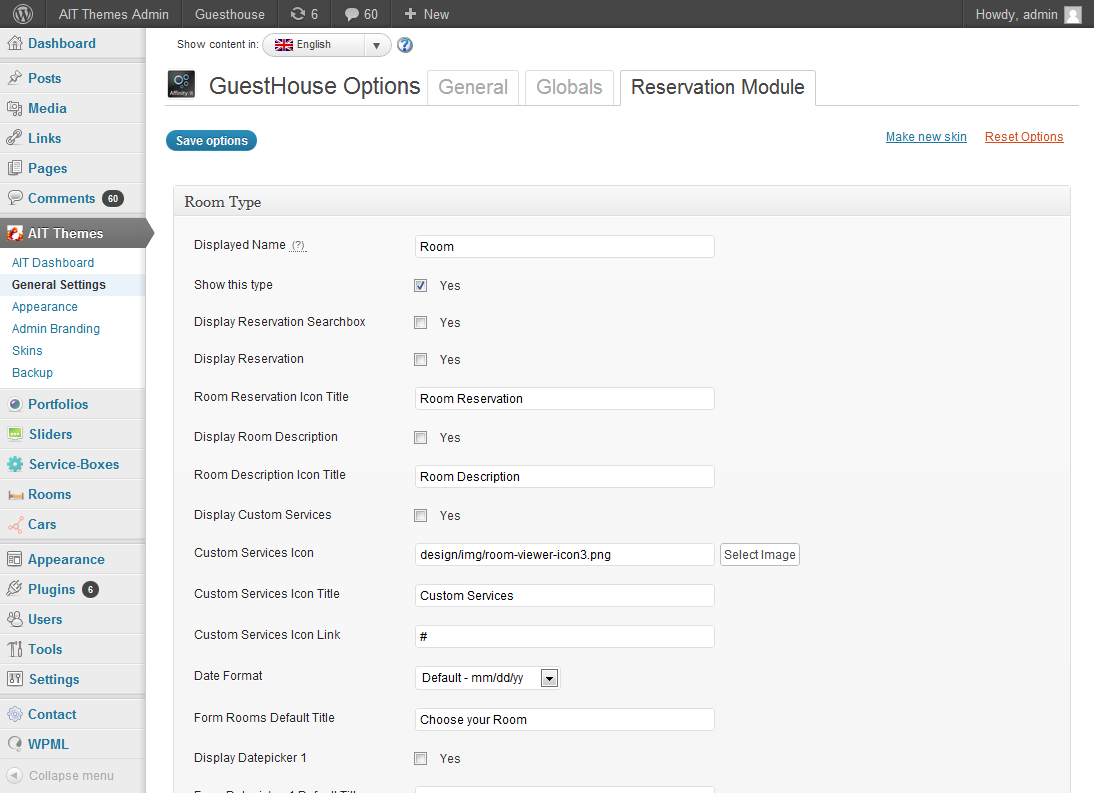
The reservation module can be found in the AIT Themes > Reservation module.
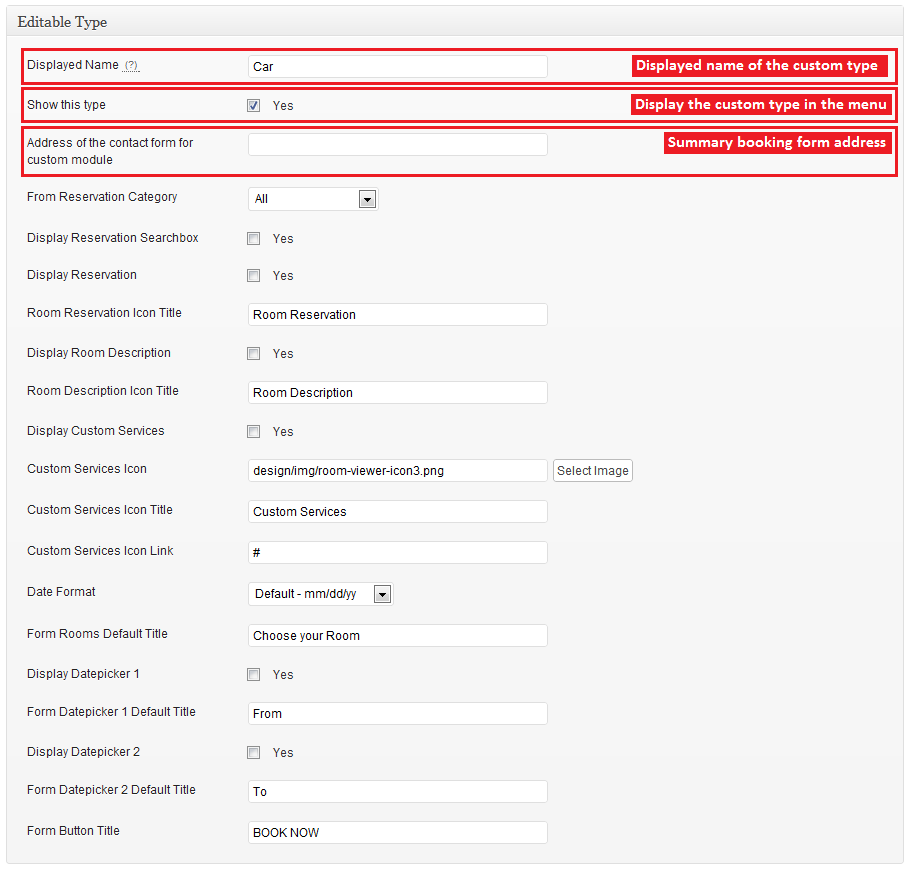
Both the "Rooms" custom type and "Editable" custom type can be set-up in here. Each of the custom types have special settings which are ilustrated in the images.
[notification type="error"]!!! When renaming a custom type, use only name in singular !!! [/notification]
16. Slider with custom reservation module
[notification type="attention"]!!! This functionality is avalaible from Guesthouse version 2.0 !!![/notification]
The newly added functionality combines the slider function with the reservation function. The older version of this functionality was presented by the room viewer, in which you can insert and book only rooms. Newly added function enables you to book possibly anything. Layout stayed the same as in the room viewer as you can see in the picture.
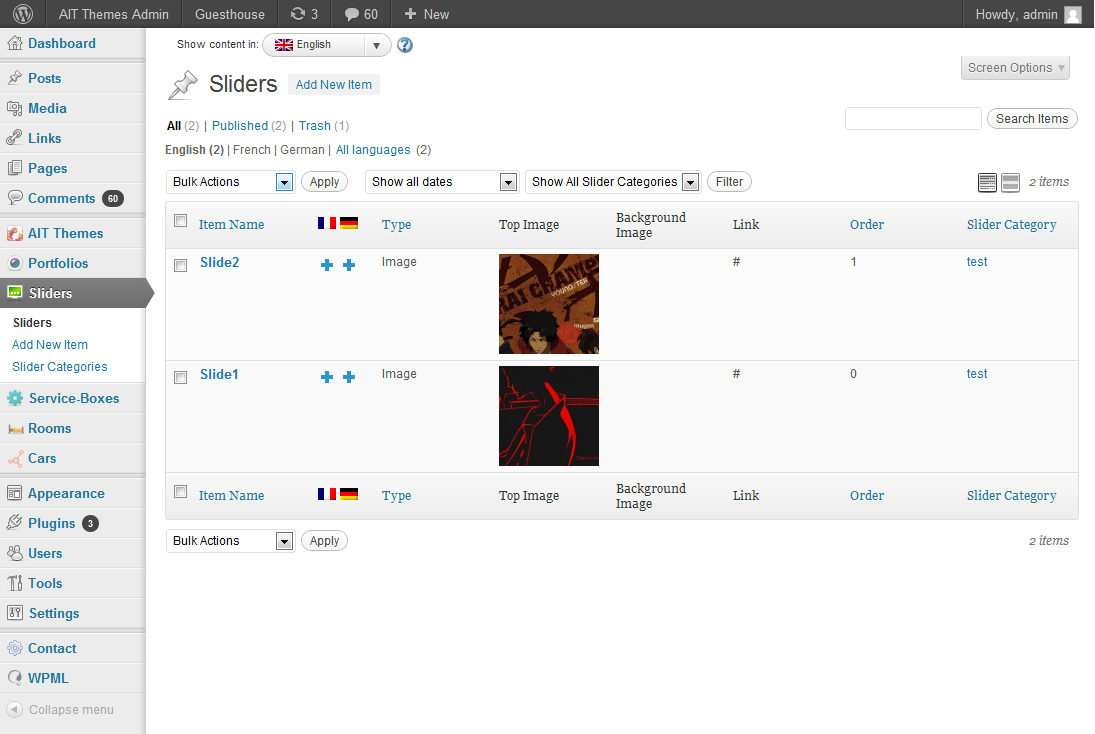
Pictures for this slider can be inserted through the slider menu in the wordpress admin. This is ilustrated in the picture below.
Adding of the picture is done by clicking on the 'Add new' link. The foolowing properties can be set up on each slide:
- Title - Title of the slide
- Top Image - Image shown in the slider
- Background Image - Not used in this slider
- Link - Href to which the custoer will be redirected when he click on the slide
- Description - The short text describing the picture
- Description Position - Position of the description
- Description Top Position - Top position of the description
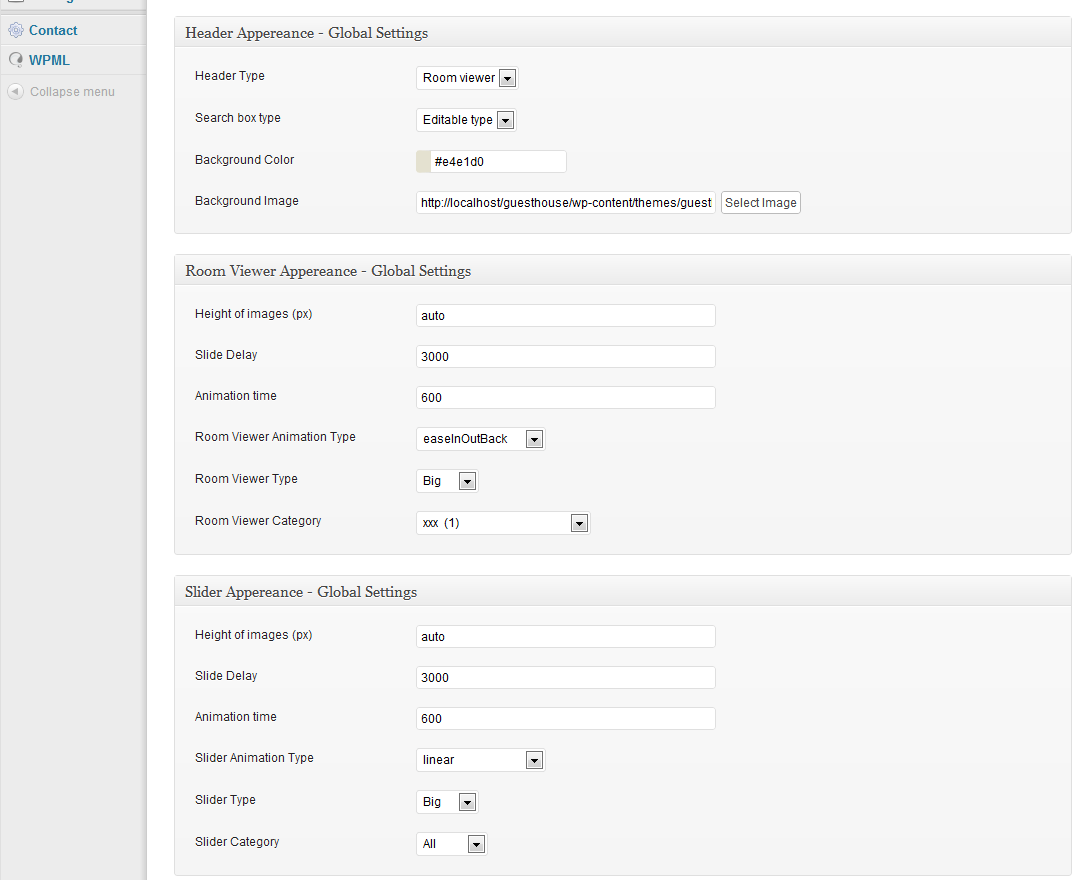
This slider can be placed to the page with the global settings (AIT Themes > Globals) and also by the local settings (At each page / post). Global settings are shown in the picture below. The reservation module set up separately here: Reservation module
Settings are separated into 3 metaboxes:
- Header Appereance
- Header Type - Type of header to show (Room viewer | Slider)
- Search box type - Type of reservation items (Room type | Editable type)
- Background color - Color of the background behind the slider
- Background image - Image of the background behind the slider
- Room Viewer Appereance
- Height of images (px) - Can be any positive number, recommended value: auto
- Slide delay - Delay between two slides, recommended value: 3000
- Animation time - Time of the animation from one slide to another, recommended value: 600
- Room viewer animation type - Type of the animation between two slides
- Room viewer type - Type of the room viewer (Big | Small | None)
- Room viewer category - The category of the slides inserted into the viewer
- Slider Appereance
- Height of images (px) - Can be any positive number, recommended value: auto
- Slide delay - Delay between two slides, recommended value: 3000
- Animation time - Time of the animation from one slide to another, recommended value: 600
- Slider animation type - Type of the animation between two slides
- Slider type - Type of the room viewer (Big | Small | None)
- Slider category - The category of the slides inserted into the viewer
Local setting looks similar to this. In next we will try to insert this kind of slider in a few easy steps.
1. In your wordpress admin, navigate to a page in which you want the slider to be shown.
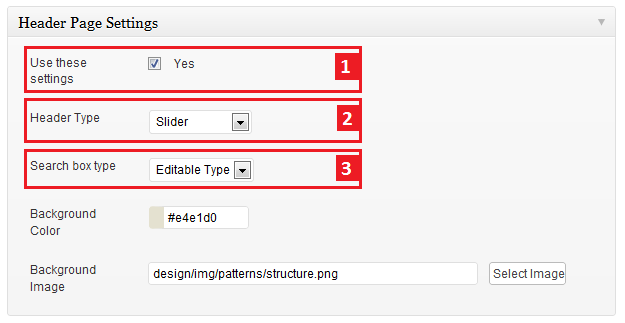
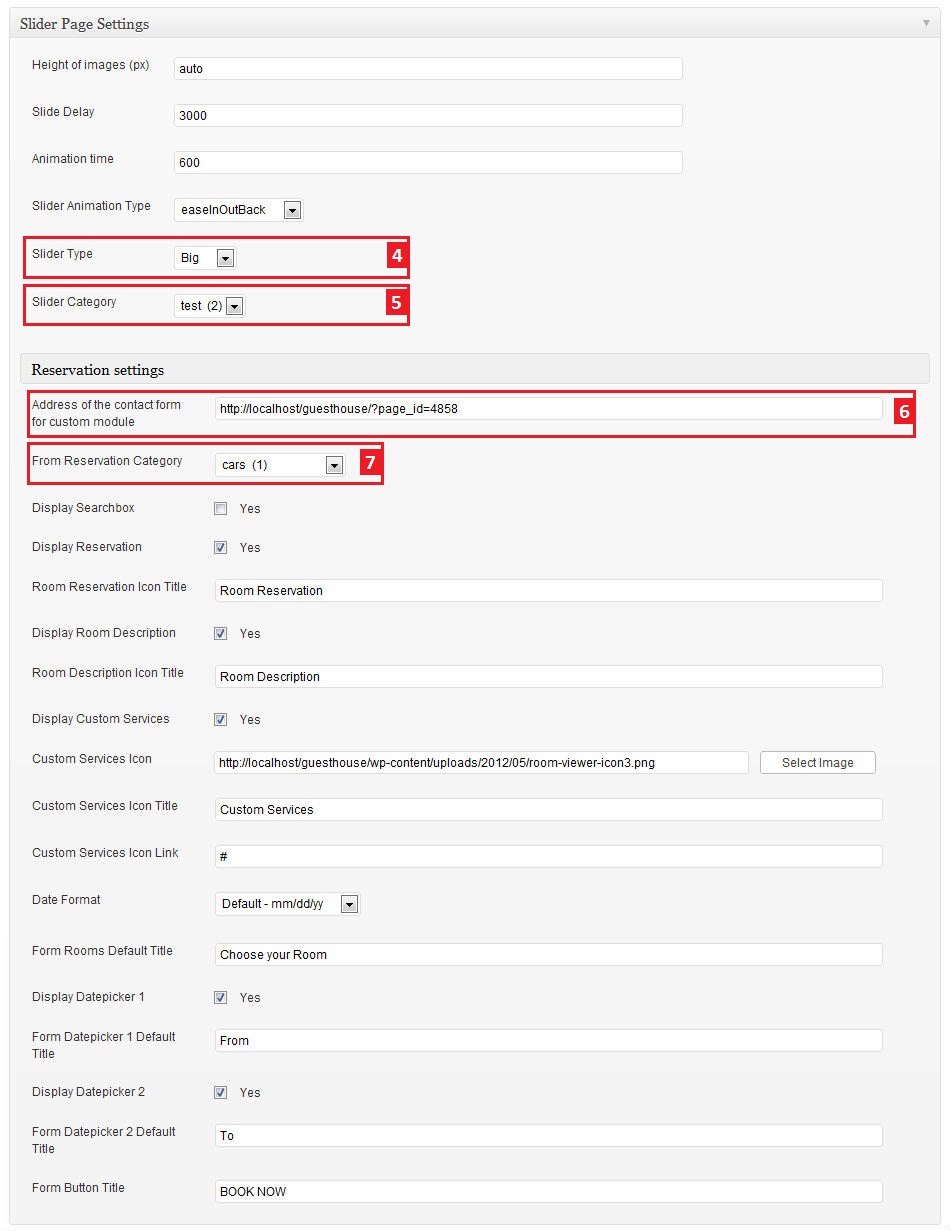
2. In the page, there are two metaboxes ilustrated below. Follow the steps on the pictures to properly set up the slider with the custom reservation form.
Here you set up the header type to slider. Other setting of this controller is the "Room viewer", which will include a room viewer into the page.
Second controller sets which reservation type will be used in the slider booking form. This controller has two settings. First is the "Room type" and second is the "Editable type". Both can be renamed in the Reservation module.
3. Second metabox have this setup
4.Last step is to set up the reservation form. For this step to complete you must have "Contact form 7" and "Contact form 7 - Dynamic Text Extension".
The procedure, also with the default provided form can be found here. When you dont need to have another summary booking form, use the one created in the process, when you set up the room viewer.

